mixasm, the MIXAL assemblermixvm, the MIX computer simulatorgmixvm, the GTK virtual machinemixguile, the Scheme virtual machinemixasm, the MIXAL assembler
mixvm, the MIX computer simulator
gmixvm, the GTK virtual machine
mixguile, the Scheme virtual machine
This manual is for GNU MDK (version 1.2.3, August, 2006), a set of utilities for developing programs using Donald Knuth's MIX mythical computer and MIXAL, its assembly language.
Copyright © 2000, 2001, 2002, 2003, 2004, 2005, 2006 Free Software Foundation, Inc.
Permission is granted to copy, distribute and/or modify this document under the terms of the GNU Free Documentation License, Version 1.2 or any later version published by the Free Software Foundation; with the Invariant Sections being “GNU General Public License”, with the Front-Cover Texts being “A GNU Manual,” and with the Back-Cover Texts as in (a) below. A copy of the license is included in the section entitled “GNU Free Documentation License”.(a) The FSF's Back-Cover Text is: “You are free to copy and modify this GNU Manual. Buying copies from GNU Press supports the FSF in developing GNU and promoting software freedom.”
GNU MDK was written and designed by Jose Antonio Ortega Ruiz.
Pieter E. J. Pareit is the author of the Emacs MIXAL mode
(see MIXAL mode), and has also contributed many bug fixes.
Philip E. King has contributed to this package development with many helpful discussions, as well as actual code (see GUD integration).
Michael Scholz is the author of the German translation of mdk's user interface.
--- The Detailed Node Listing ---
Installing mdk
MIX and MIXAL tutorial
The MIX computer
MIX instruction set
MIXAL
Getting started
Running the program
Using mixguile
Hook functions
Emacs tools
MIXAL mode
mixasm, the MIXAL assembler
mixvm, the MIX computer simulator
Interactive commands
gmixvm, the GTK virtual machine
mixguile, the Scheme virtual machine
Scheme functions reference
Copying
In his book series The Art of Computer Programming (published by Addison Wesley), D. Knuth uses an imaginary computer, the MIX, and its associated machine-code and assembly languages to ilustrate the concepts and algorithms as they are presented.
The MIX's architecture is a simplified version of those found in real CISC CPUs, and the MIX assembly language (MIXAL) provides a set of primitives that will be very familiar to any person with a minimum experience in assembly programming. The MIX/MIXAL definition is powerful and complete enough to provide a virtual development platform for writing quite complex programs, and close enough to real computers to be worth using when learning programming techniques. At any rate, if you want to learn or improve your programming skills, a MIX development environment would come in handy.
The mdk package aims at providing such virtual development environment on a GNU box. Thus, mdk offers you a set of utilities to simulate the MIX computer and to write, compile, run and debug MIXAL programs. As of version 1.2.3, mdk includes the following programs:
mixasmmixvm, mixguile
or gmixvm.
mixvmgmixvmmixvm
functionality accessible through a graphical interface.
mixguilemixal-mode.elmixvm
within Emacs.
mixvm.elmixvm inside an Emacs GUD
buffer, providing concurrent edition and debugging of MIXAL programs.
mixvm and gmixvm implement a simulator of the MIX
computer, giving you a virtual machine for executing and debugging MIX
programs. These binary programs could be written by hand, but it is
easier to produce them compiling MIXAL source files, using the MIXAL
assembler mixasm. On the other hand, mixguile offers you
the possibility of manipulating a MIX virtual machine through a set of
Scheme functions, so that you can use this programming language to
interact with the virtual machine. In addition, mixvm and
gmixvm are also able to interpret Scheme scripts (using an
embedded Guile interpreter), that is, you can use Scheme as an extension
language to add new functionalities to these programs.
This manual gives you a tutorial of MIX and MIXAL, and a thorough description of the use of the mdk utilities.
Many people have further contributed to mdk by reporting problems, suggesting various improvements, or submitting actual code. Here is a list of these people. Help me keep it complete and exempt of errors.
mixvm and influenced the gmixvm GUI
design with insightful comments and prototypes.
GNU mdk is distributed as a source tarball available for download in the following URLs:
The above sites contain the latest stable releases of mdk. The development branch is available as a GNU Arch archive located at1
After you have downloaded the source tarball, unpack it in a directory of your choice using the command:
tar xfvz mdk-X.Y.tar.gz
where X.Y stands for the downloaded version (the current stable release being version 1.2.3).
In order to build and install mdk, you will need the following libraries installed in your system:
If present, readline and history are used to provide command completion
and history management to the command line MIX virtual machine, mixvm.
GTK+ and libglade are needed if you want to build the graphical
interface to the MIX virtual machine, gmixvm. Finally, if
libguile is found, the mdk utilities will be compiled with Guile
support and will be extensible using Scheme.
Please note: you need both the libraries and the headers; this means both the library package and the -dev package if you do not compile your libraries yourself (ex: installing libgtk2.0-0 and libgtk2.0-0-dev on Debian).
mdk uses GNU Autoconf and Automake tools, and, therefore, should be built and installed without hassle using the following commands inside the source directory:
     ./configure
     make
     make install
where the last one must be run as root.
The first command, configure, will setup the makefiles for your
system. In particular, configure will look for GTK+ and libglade,
and, if they are present, will generate the appropiate makefiles for
building the gmixvm graphical user interface. Upon completion,
you should see a message with the configuration results like the
following:
     *** GNU MDK 1.2 has been successfully configured. ***

     Type 'make' to build the following utilities:
         - mixasm (MIX assembler)
         - mixvm (MIX virtual machine, with readline support,
                  with guile support)
         - gmixvm (mixvm GTK+ GUI, with guile support)
         - mixguile (the mixvm guile shell)
where the last lines may be missing if you lack the above mentioned libraries.
The next command, make, will actually build the mdk programs
in the following locations:
You can run these programs from within their directories, but I
recommend you to install them in proper locations using make
install from a root shell.
mdk includes extensive support for Emacs. Upon installation, all the elisp code is installed in PREFIX/share/mdk, where PREFIX stands for your installation root directory (e.g. /usr/local). You can copy the elisp files to a directory that is in your load-path, or you can add the above directory to it. Assuming that the installing prefix is /usr/local, you can do it by adding to your .emacs file the following line:
(setq load-path (cons "/usr/local/share/mdk" load-path))
MIXAL programs can be written using Emacs and the elisp program
share/mdk/mixal-mode.el, contributed by Pieter E. J. Pareit. It
provides font locking, interactive help, compiling assistance and
invocation of the MIX virtual machine via a new major mode
called mixal-mode. To start mixal-mode automatically
whenever you edit a MIXAL source file, add the following lines
to your .emacs file:
     (autoload 'mixal-mode "mixal-mode" t)
     (add-to-list 'auto-mode-alist '("\\.mixal\\'" . mixal-mode))
In addition, mixvm can be run within an Emacs GUD
buffer using the elisp program share/mdk/mixvm.el, contributed
by Philip E. King. mixvm.el provides an interface between
mdk's mixvm and Emacs, via GUD. Place this file
in your load-path, optionally adding the following line to your
.emacs file:
(autoload 'mixvm "mixvm" "mixvm/gud interaction" t)
You can fine-tune the configuration process using the following switches with configure:
Enables/disables the build of the MIX virtual machine GUI (
gmixvm). If the required libraries are missing (see Requirements) the configure script with automatically disable this feature.
Enables/disables the Guile support for
mixvmandgmixvm, and the build ofmixguile. If the required libraries are missing (see Requirements) the configure script with automatically disable this feature.
Enables/disables the GNU Readline support for
mixvm. If the required libraries are missing (see Requirements) the configure script with automatically disable this feature.
For additional, boilerplate configure options, see the INSTALL file, or run
configure --help
GNU MDK has been tested in the following platforms:
mdk will probably work on any GNU/Linux or BSD platform. If you try it in a platform not listed above, please send a mail to the author.
In the book series The Art of Computer Programming, by D. Knuth, a virtual computer, the MIX, is used by the author (together with the set of binary instructions that the virtual CPU accepts) to illustrate the algorithms and skills that every serious programmer should master. Like any other real computer, there is a symbolic assembler language that can be used to program the MIX: the MIX assembly language, or MIXAL for short. In the following subsections you will find a tutorial on these topics, which will teach you the basics of the MIX architecture and how to program a MIX computer using MIXAL.
In this section, you will find a description of the MIX computer, its components and instruction set.
The basic information storage unit in the MIX computer is the byte, which stores positive values in the range 0-63 . Note that a MIX byte can be then represented as 6 bits, instead of the common 8 bits for a regular byte. Unless otherwise stated, we shall use the word byte to refer to a MIX 6-bit byte.
A MIX word is defined as a set of 5 bytes plus a sign. The bytes within a word are numbered from 1 to 5, being byte number one the most significant one. The sign is denoted by index 0. Graphically,
      -----------------------------------------------
     |   0   |   1   |   2   |   3   |   4   |   5   |
      -----------------------------------------------
     |  +/-  | byte  | byte  | byte  | byte  | byte  |
      -----------------------------------------------
Sample MIX words are `- 12 00 11 01 63' and `+ 12 11 34 43 00'.
You can refer to subfields within a word using a field
specification or fspec of the form “(L:R)”, where
L denotes the first byte, and R the last byte of the
subfield.
When L is zero, the subfield includes the word's
sign. An fspec can also be represented as a single value F, given
by F = 8*L + R (thus the fspec `(1:3)', denoting the first
three bytes of a word, is represented by the integer 11).
The MIX computer stores information in registers, that can store either a word or two bytes and sign (see below), and memory cells, each one containing a word. Specifically, the MIX computer has 4000 memory cells with addresses 0 to 3999 (i.e., two bytes are enough to address a memory cell) and the following registers:
rArXrJrI1, rI2, rI3, rI4, rI5, rI6In addition, the MIX computer contains:
un, where
n runs from 0 to 20. In Knuth's definition, u0 through
u7 are magnetic tape units, u8 through 15 are disks
and drums, u16 is a card reader, u17 is a card writer,
u18 is
a line printer and, u19 is a typewriter terminal, and u20,
a paper tape. Our implementation maps these devices to disk files,
except for u19, which represents the standard output.
As noted above, the MIX computer communicates with the external world by a set of input-output devices which can be “connected” to it. The computer interchanges information using blocks of words whose length depends on the device at hand (see Devices). These words are interpreted by the device either as binary information (for devices 0-16), or as representing printable characters (devices 17-20). In the last case, each MIX byte is mapped onto a character according to the following table:
| 00 | 01 | A | 02 | B | 03 | C
| |
| 04 | D | 05 | E | 06 | F | 07 | G
|
| 08 | H | 09 | I | 10 | ~ | 11 | J
|
| 12 | K | 13 | L | 14 | M | 15 | N
|
| 16 | O | 17 | P | 18 | Q | 19 | R
|
| 20 | [ | 21 | # | 22 | S | 23 | T
|
| 24 | U | 25 | V | 26 | W | 27 | X
|
| 28 | Y | 29 | Z | 30 | 0 | 31 | 1
|
| 32 | 2 | 33 | 3 | 34 | 4 | 35 | 5
|
| 36 | 6 | 37 | 7 | 38 | 8 | 39 | 9
|
| 40 | . | 41 | , | 42 | ( | 43 | )
|
| 44 | + | 45 | - | 46 | * | 47 | /
|
| 48 | = | 49 | $ | 50 | < | 51 | >
|
| 52 | @ | 53 | ; | 54 | : | 55 | '
|
~, [ and
# correspond to symbols not representable as ASCII characters
(uppercase delta, sigma and gamma, respectively), and byte values 56-63
have no associated character.
Finally, the MIX computer features a virtual CPU which controls the above components, and which is able to execute a rich set of instructions (constituting its machine language, similar to those commonly found in real CPUs), including arithmetic, logical, storing, comparison and jump instructions. Being a typical von Neumann computer, the MIX CPU fetchs binary instructions from memory sequentially (unless a jump instruction is found), and stores the address of the next instruction to be executed in an internal register called location counter (also known as program counter in other architectures).
The next section, See MIX instruction set, gives a complete description of the available MIX binary instructions.
The following subsections fully describe the instruction set of the MIX computer. We begin with a description of the structure of binary instructions and the notation used to refer to their subfields. The remaininig subsections are devoted to describing the actual instructions available to the MIX programmer.
MIX instructions are codified as words with the following subfield structure:
| Subfield | fspec | Description
|
| ADDRESS | (0:2) | The first two bytes plus sign are the address field. Combined
with the INDEX field, denotes the memory address to be used by the
instruction.
|
| INDEX | (3:3) | The third byte is the index, normally used for indexing the
address3.
|
| MOD | (4:4) | Byte four is used either as an operation code modifier or as a field
specification.
|
| OPCODE | (5:5) | The last (least significant) byte in the word denotes the operation
code.
|
or, graphically,
      ------------------------------------------------
     |   0   |   1   |   2   |   3   |   4   |   5    |
      ------------------------------------------------
     |        ADDRESS        | INDEX |  MOD  | OPCODE |
      ------------------------------------------------
For a given instruction, `M' stands for the memory address obtained after indexing the ADDRESS subfield (using its INDEX byte), and `V' is the contents of the subfield indicated by MOD of the memory cell with address `M'. For instance, suppose that we have the following contents of MIX registers and memory cells:
     [rI2] = + 00 63
     [31] = - 10 11 00 11 22
where `[n]' denotes the contents of the nth memory cell and `[rI2]' the contents of register `rI2'4. Let us consider the binary instruction `I = - 00 32 02 11 10'. For this instruction we have:
     ADDRESS = - 00 32 = -32
     INDEX = 02 = 2
     MOD = 11 = (1:3)
     OPCODE = 10

     M = ADDRESS + [rI2] = -32 + 63 = 31
     V = [M](MOD) = (- 10 11 00 11 22)(1:3) = + 00 00 10 11 00
Note that, when computing `V' using a word and an fspec, we apply a left padding to the bytes selected by `MOD' to obtain a complete word as the result.
In the following subsections, we will assign to each MIX instruction a mnemonic, or symbolic name. For instance, the mnemonic of `OPCODE' 10 is `LD2'. Thus we can rewrite the above instruction as
LD2 -32,2(1:3)
or, for a generic instruction:
MNEMONIC ADDRESS,INDEX(MOD)
Some instructions are identified by both the OPCODE and the MOD fields. In these cases, the MOD will not appear in the above symbolic representation. Also when ADDRESS or INDEX are zero, they can be omitted. Finally, MOD defaults to (0:5) (meaning the whole word).
The following instructions are used to load memory contents into a register.
LDArA <- V.
LDXrX <- V.
LDirIi <- V.
LDANrA <- -V.
LDXNrX <- -V.
LDiNrIi <- -V.
In all the above load instructions the `MOD' field selects the bytes of the memory cell with address `M' which are loaded into the requisite register (indicated by the `OPCODE'). For instance, the word `+ 00 13 01 27 11' represents the instruction
     LD3    13,1(3:3)
      ^      ^ ^  ^
      |      | |  |
      |      | |   --- MOD = 27 = 3*8 + 3
      |      |  --- INDEX = 1
      |       --- ADDRESS = 00 13
       --- OPCODE = 11
Let us suppose that, prior to this instruction execution, the state of the MIX computer is the following:
     [rI1] = - 00 01
     [rI3] = + 24 12
     [12] = - 01 02 03 04 05
As, in this case, `M = 13 + [rI1] = 12', we have
     V = [M](3:3) = (- 01 02 03 04 05)(3:3)
       = + 00 00 00 00 03
(note that the specified subfield is left-padded with null bytes to complete a word). Hence, the MIX state, after the instruction execution, will be
     [rI1] = - 00 01
     [rI3] = + 00 03
     [12] = - 01 02 03 04 05
To further illustrate loading operators, the following table shows the contents of `rX' after different `LDX' instructions:
The following instructions are the inverse of the load operations: they are used to store a subfield of a register into a memory location. Here, MOD represents the subfield of the memory cell that is to be overwritten with bytes from a register. These bytes are taken beginning by the rightmost side of the register.
STAV <- rA.
STXV <- rX.
STiV <- rIi.
STJV <- rJ.
STZV <- 0.
By way of example, consider the instruction `STA 1200(2:3)'. It causes the MIX to fetch bytes no. 4 and 5 of register A and copy them to bytes 2 and 3 of memory cell no. 1200 (remember that, for these instructions, MOD specifies a subfield of the memory address). The other bytes of the memory cell retain their values. Thus, if prior to the instruction execution we have
     [1200] = - 20 21 22 23 24
     [rA] = + 01 02 03 04 05
we will end up with
     [1200] = - 20 04 05 23 24
     [rA] = + 01 02 03 04 05
As a second example, `ST2 1000(0)' will set the sign of `[1000]' to that of `[rI2]'.
The following instructions perform arithmetic operations between rA and rX register and memory contents.
ADDrA <- rA +V.
SUBrA <- rA - V.
MULrAX <- rA x V.
DIVrA <- rAX / V, rX <- reminder.
In all the above instructions, `[rA]' is one of the operands of the binary arithmetic operation, the other being `V' (that is, the specified subfield of the memory cell with address `M'), padded with zero bytes on its left-side to complete a word. In multiplication and division, the register `X' comes into play as a right-extension of the register `A', so that we are able to handle 10-byte numbers whose more significant bytes are those of `rA' (the sign of this 10-byte number is that of `rA': `rX''s sign is ignored).
Addition and substraction of MIX words can give rise to overflows, since the result is stored in a register with room to only 5 bytes (plus sign). When this occurs, the operation result modulo 1,073,741,823 (the maximum value storable in a MIX word) is stored in `rA', and the overflow toggle is set to TRUE.
In these instructions, `M' (the address of the instruction after indexing) is used as a number instead of as the address of a memory cell. Consequently, `M' can have any valid word value (i.e., it's not limited to the 0-3999 range of a memory address).
ENTArA <- M.
ENTXrX <- M.
ENTirIi <- M.
ENNArA <- -M.
ENNXrX <- -M.
ENNirIi <- -M.
INCArA <- rA + M.
INCXrX <- rX + M.
INCirIi <- rIi + M.
DECArA <- rA - M.
DECXrX <- rX - M.
DECirIi <- rIi - M.
In the above instructions, the subfield `ADDRESS' acts as an immediate (indexed) operand, and allow us to set directly the contents of the MIX registers without an indirection to the memory cells (in a real CPU this would mean that they are faster that the previously discussed instructions, whose operands are fetched from memory). So, if you want to store in `rA' the value -2000 (- 00 00 00 31 16), you can use the binary instruction + 31 16 00 03 48, or, symbolically,
ENNA 2000
Used in conjuction with the store operations (`STA', `STX', etc.), these instructions also allow you to set memory cells contents to concrete values.
Note that in these address transfer operators, the `MOD' field is not a subfield specificator, but serves to define (together with `OPCODE') the concrete operation to be performed.
So far, we have learned how to move values around between the MIX registers and its memory cells, and also how to perform arithmetic operations using these values. But, in order to write non-trivial programs, other functionalities are needed. One of the most common is the ability to compare two values, which, combined with jumps, will allow the execution of conditional statements. The following instructions compare the value of a register with `V', and set the cm indicator to the result of the comparison (i.e. to `E', `G' or `L', equal, greater or lesser respectively).
CMPACMPXCMPiAs explained above, these instructions modify the value of the MIX comparison indicator; but maybe you are asking yourself how do you use this value: enter jump operators, in the next subsection.
The MIX computer has an internal register, called the location
counter, which stores the address of the next instruction to be fetched
and executed by the virtual CPU. You cannot directly modify the contents
of this internal register with a load instruction: after fetching the
current instruction from memory, it is automatically increased in one
unit by the MIX. However, there is a set of instructions (which we call
jump instructions) which can alter the contents of the location counter
provided some condition is met. When this occurs, the value of the next
instruction address that would have been fetched in the absence of the
jump is stored in `rJ' (except for JSJ), and the location
counter is set to the value of `M' (so that the next instruction is
fetched from this new address). Later on, you can return to the point
when the jump occurred reading the address stored in `rJ'.
The MIX computer provides the following jump instructions: With these instructions you force a jump to the specified address. Use `JSJ' if you do not care about the return address.
JMPJSJThese instructions check the overflow toggle to decide whether to jump or not.
JOVJNOVIn the following instructions, the jump is conditioned to the contents of the comparison flag:
JL[CM] = L. OPCODE = 39, MOD = 4.
JE[CM] = E. OPCODE = 39, MOD = 5.
JG[CM] = G. OPCODE = 39, MOD = 6.
JGE[CM] does not equal L. OPCODE = 39, MOD = 7.
JNE[CM] does not equal E. OPCODE = 39, MOD = 8.
JLE[CM] does not equal G. OPCODE = 39, MOD = 9.
You can also jump conditioned to the value stored in the MIX registers, using the following instructions:
JANJAZJAPJANNJANZJANPJXNJXZJXPJXNNJXNZJXNPJiNJiZJiPJiNNJiNZJiNPAs explained in previous sections (see MIX architecture), the MIX computer can interact with a series of block devices. To that end, you have at your disposal the following instructions:
INOUTIOCJREDJBUSThe following instructions convert between numerical values and their character representations.
NUMCHAR [rA] = + 30 30 31 32 33
[rX] = + 31 35 39 30 34
the represented number is 0012315904, and `NUM' will store this value in `rA' (i.e., we end up with `[rA]' = + 0 46 62 52 0 = 12315904).
If any byte in `rA' or `rB' does not belong to the range 30-39, it is interpreted by `NUM' as the digit obtained by taking its value modulo 10. E.g. values 0, 10, 20, 30, 40, 50, 60 all represent the digit 0; 2, 12, 22, etc. represent the digit 2, and so on. For instance, the number 0012315904 mentioned above could also be represented as
     [rA] = + 10 40 31 52 23
     [rX] = + 11 35 49 20 54
`CHAR' performs the inverse operation, using only the values 30 to 39 for representing digits 0-9.
The following instructions perform byte-wise shifts of the contents of `rA' and `rX'.
SLASRASLAXSRAXSLCSRC| SLA 2 | [rA] = - 03 04 05 00 00
|
| SLA 6 | [rA] = - 00 00 00 00 00
|
| SRA 1 | [rA] = - 00 01 02 03 04
|
| SLC 3 | [rA] = + 04 05 06 07 08 | [rX] = - 09 10 01 02 03
|
| SLAX 3 | [rA] = + 04 05 06 07 08 | [rX] = - 09 10 00 00 00
|
| SRC 4 | [rA] = + 07 08 09 10 01 | [rX] = - 02 03 04 05 06
|
| SRAX 4 | [rA] = + 00 00 00 00 01 | [rX] = - 02 03 04 05 06
|
Finally, we list in the following table three miscellaneous MIX instructions which do not fit in any of the previous subsections:
MOVENOPHLTWhen writing MIXAL programs (or any kind of programs, for that matter), whe shall often be interested in their execution time. Loosely speaking, we will interested in the answer to the question: how long takes a program to execute? Of course, this execution time will be a function of the input size, and the answer to our question is commonly given as the asymptotic behaviour as a function of the input size. At any rate, to compute this asymptotic behaviour, we need a measure of how long execution of a single instruction takes in our (virtual) CPU. Therefore, each MIX instruction will have an associated execution time, given in arbitrary units (in a real computer, the value of this unit will depend on the hardware configuration). When our MIX virtual machine executes programs, it will (optionally) give you the value of their execution time based upon the execution time of each single instruction.
In the following table, the execution times (in the above mentioned arbitrary units) of the MIX instructions are given.
NOP | 1 | ADD | 2 | SUB
| 2 | MUL | 10
|
DIV | 12 | NUM | 10 | CHAR
| 10 | HLT | 10
|
SLx | 2 | SRx | 2 | LDx
| 2 | STx | 2
|
JBUS | 1 | IOC | 1 | IN
| 1 | OUT | 1
|
JRED | 1 | Jx | 1 | INCx
| 1 | DECx | 1
|
ENTx | 1 | ENNx | 1 | CMPx
| 1 | MOVE | 1+2F
|
In the above table, 'F' stands for the number of blocks to be moved
(given by the FSPEC subfield of the instruction); SLx and
SRx are a short cut for the byte-shifting operations; LDx
denote all the loading operations; STx are the storing
operations; Jx stands for all the jump operations, and so on with
the rest of abbreviations.
In the previous sections we have listed all the available MIX binary instructions. As we have shown, each instruction is represented by a word which is fetched from memory and executed by the MIX virtual CPU. As is the case with real computers, the MIX knows how to decode instructions in binary format (the so–called machine language), but a human programmer would have a tough time if she were to write her programs in machine language. Fortunately, the MIX computer can be programmed using an assembly language, MIXAL, which provides a symbolic way of writing the binary instructions understood by the imaginary MIX computer. If you have used assembler languages before, you will find MIXAL a very familiar language. MIXAL source files are translated to machine language by a MIX assembler, which produces a binary file (the actual MIX program) which can be directly loaded into the MIX memory and subsequently executed.
In this section, we describe MIXAL, the MIX assembly language. The implementation of the MIX assembler program and MIX computer simulator provided by mdk are described later on (see Getting started).
The MIX assembler reads MIXAL files line by line, producing, when required, a binary instruction, which is associated to a predefined memory address. To keep track of the current address, the assembler maintains an internal location counter which is incremented each time an instruction is compiled. In addition to MIX instructions, you can include in MIXAL file assembly directives (or pseudoinstructions) addressed at the assembler itself (for instance, telling it where the program starts and ends, or to reposition the location counter; see below).
MIX instructions and assembler directives6 are written in MIXAL (one per source file line) according to the following pattern:
[LABEL] MNEMONIC [OPERAND] [COMMENT]
where `OPERAND' is of the form
[ADDRESS][,INDEX][(MOD)]
Items between square brackets are optional, and
LABELMNEMONICLDA, STA; see see MIX instruction set) or an
assembly pseudoinstruction (e.g. ORG, EQU),
ADDRESSINDEXADDRESS is present,
MODOPCODE,
COMMENTNote that spaces are not allowed between the ADDRESS,
INDEX and MOD fields if they are present. White space is
used to separate the label, operation code and operand parts of the
instruction7.
We have already listed the mnemonics associated will each MIX instructions; sample MIXAL instructions representing MIX instructions are:
     HERE     LDA  2000         HERE represents the current location counter
              LDX  HERE,2(1:3)  this is a comment
              JMP  1234
MIXAL instructions can be either one of the MIX machine instructions (see MIX instruction set) or one of the following assembly pseudoinstructions:
ORIGEQUSYM EQU 2*200/3.
CONALFENDThe operand of ORIG, EQU, CON and END can be
any expression evaluating to a constant MIX word, i.e., either a simple
MIXAL expression (composed of numbers, symbols and binary operators,
see Expressions) or a w-expression (see W-expressions).
All MIXAL programs must contain an END directive, with a twofold
end: first, it marks the end of the assembler job, and, in the second
place, its (mandatory) operand indicates the start address for the
compiled program (that is, the address at which the virtual MIX machine
must begin fetching instructions after loading the program). It is also
very common (although not mandatory) to include at least an ORIG
directive to mark the initial value of the assembler's location counter
(remember that it stores the address associated with each compiled MIX
instruction). Thus, a minimal MIXAL program would be
               ORIG  2000    set the initial compilation adress
               NOP           this instruction will be loaded at adress 2000
               HLT           and this one at address 2001
               END   2000    end of program; start at address 2000
     this line is not parsed by the assembler
The assembler will generate two binary instructions (NOP (+ 00 00 00 00 00) and HLT (+ 00 00 02 05)), which will be loaded at
addresses 2000 and 2001. Execution of the program will begin at address
2000. Every MIXAL program should also include a HLT instruction,
which will mark the end of program execution (but not of program
compilation).
The EQU directive allows the definition of symbolic names for
specific values. For instance, we could rewrite the above program as
follows:
     START     EQU   2000
               ORIG  START
               NOP
               HLT
               END   START
which would give rise to the same compiled code. Symbolic constants (or
symbols, for short) can also be implicitly defined placing them in the
LABEL field of a MIXAL instruction: in this case, the assembler
assigns to the symbol the value of the location counter before compiling
the line. Hence, a third way of writing our trivial program is
               ORIG  2000
     START     NOP
               HLT
               END   START
The CON directive allows you to directly specify the contents of
the memory address pointed by the location counter. For instance, when
the assembler encounters the following code snippet
               ORIG  1150
               CON   -1823473
it will assign to the memory cell number 1150 the contents - 00 06 61 11 49 (which corresponds to the decimal value -1823473).
Finally, the ALF directive let's you specify the memory contents
as a set of five (optionally quoted) characters, which are translated by
the assembler to their byte values, conforming in that way the binary
word that is to be stored in the corresponding memory cell. This
directive comes in handy when you need to store printable messages in a
memory address, as in the following example 8:
               OUT  MSG       MSG is not yet defined here (future reference)
     MSG       ALF  "THIS "   MSG gets defined here
               ALF  "IS A "
               ALF  "MESSA"
               ALF  "GE.  "
The above snippet also shows the use of a future reference, that
is, the usage of a symbol (MSG in the example) prior of its actual
definition. The MIXAL assembler is able to handle future references
subject to some limitations which are described in the following section
(see Expressions).
Any line starting with an asterisk is treated as a comment and ignored by the assembler.
     * This is a comment: this line is ignored.
         * This line is an error: * must be in column 1.
As noted in the previous section, comments can also be located after the
OPERAND field of an instruction, separated from it by white
space, as in
LABEL LDA 100 This is also a comment
The ADDRESS, INDEX and MOD fields of a MIXAL
instruction can be expressions, formed by numbers, identifiers and
binary operators (+ - * / // :). + and - can also
be used as unary operators. Operator precedence is from left to right:
there is no other operator precedence rule, and parentheses cannot be
used for grouping. A stand-alone asterisk denotes the current memory
location; thus, for instance,
4+2**
evaluates to 6 (4 plus 2) times the current memory location. White space is not allowed within expressions.
The special binary operator : has the same meaning as in fspecs,
i.e.,
A:B = 8*A + B
while A//B stands for the quotient of the ten-byte number A 00 00 00 00 00 (that is, A right-padded with 5 null bytes or, what amounts
to the same, multiplied by 64 to the fifth power) divided by
B. Sample expressions are:
     18-8*3 = 30
     14/3 = 4
     1+3:11 = 4:11 = 43
     1//64 = (01 00 00 00 00 00)/(00 00 00 01 00) = (01 00 00 00 00)
Note that all MIXAL expressions evaluate to a MIX word (by definition).
All symbols appearing within an expression must be previously defined. Future
references are only allowed when appearing standalone (or modified by
an unary operator) in the ADDRESS part of a MIXAL instruction,
e.g.
     * OK: stand alone future reference
              STA  -S1(1:5)
     * ERROR: future reference in expression
              LDX  2-S1
     S1       LD1  2000
Besides expressions, as described above (see Expressions), the MIXAL
assembler is able to handle the so called w-expressions as the
operands of the directives ORIG, EQU, CON and
END (see MIXAL directives). The general form of a
w-expression is the following:
WEXP = EXP[(EXP)][,WEXP]
where EXP stands for an expression and square brackets denote
optional items. Thus, a w-expression is made by an expression, followed
by an optional expression between parenthesis, followed by any number
of similar constructs separated by commas. Sample w-expressions are:
     2000
     235(3)
     S1+3(S2),3000
     S1,S2(3:5),23
W-expressions are evaluated from left to right as follows:
As a second example, in the w-expression
1(1:2),66(4:5)
we first take two bytes from 1 (00 and 01) and store them as bytes 1 and 2 of the result (obtaining `+ 00 01 00 00 00') and, afterwards, take two bytes from 66 (01 and 02) and store them as bytes 4 and 5 of the result, obtaining `+ 00 01 00 01 02' (262210). The process is repeated for each new comma-separated example. For instance:
1(1:1),2(2:2),3(3:3),4(4:4) = 01 02 03 04 00
As stated before, w-expressions can only appear as the operands of MIXAL
directives taking a constant value (ORIG, EQU, CON
and END). Future references are not allowed within
w-expressions (i.e., all symbols appearing in a w-expression must be
defined before it is used).
Besides user defined symbols, MIXAL programmers can use the so called
local symbols, which are symbols of the form [1-9][HBF]. A
local symbol nB refers to the address of the last previous
occurrence of nH as a label, while nF refers to the next
nH occurrence. Unlike user defined symbols, nH can appear
multiple times in the LABEL part of different MIXAL
instructions. The following code shows an instance of local symbols'
usage:
     * line 1
     1H    LDA  100
     * line 2: 1B refers to address of line 1, 3F refers to address of line 4
           STA  3F,2(1B//2)
     * line 3: redefinition of 1H
     1H    STZ
     * line 4: 1B refers to address of line 3
     3H    JMP  1B
Note that a B local symbol never refers to a definition in its
own line, that is, in the following program:
     		ORIG 1999
     ST		NOP
     3H		EQU 69
     3H		ENTA 3B  local symbol 3B refers to 3H in previous line
     		HLT
     		END ST
the contents of `rA' is set to 69 and not to 2001. An
specially tricky case occurs when using local symbols in conjunction
with ORIG pseudoinstructions. To wit9,
     		ORIG 1999
     ST		NOP
     3H		CON 10
     		ENT1 *
     		LDA 3B
     ** rI1 is 2001, rA is 10.  So far so good!
     3H		ORIG 3B+1000
     ** at this point 3H equals 2003
     ** and the location counter equals 3000.
     		ENT2 *
     		LDX 3B
     ** rI2 contains 3000, rX contains 2003.
     		HLT
     		END ST
MIXAL allows the introduction of literal constants, which are
automatically stored in memory addresses after the end of the program by
the assembler. Literal constants are denoted as =wexp=, where
wexp is a w-expression (see W-expressions). For instance, the
code
     L         EQU   5
               LDA   =20-L=
causes the assembler to add after the program's end an instruction
with contents 15 (`20-L'), and to assemble the above code as the
instruction LDA a, where a stands for the address
in which the value 15 is stored. In other words, the compiled code is
equivalent to the following:
     L         EQU  5
               LDA  a
     ...
     a         CON  20-L
               END  start
In this chapter, you will find a sample code-compile-run-debug session using the mdk utilities. Familiarity with the MIX mythical computer and its assembly language MIXAL (as described in Knuth's TAOCP) is assumed; for a compact reminder, see MIX and MIXAL tutorial.
MIXAL programs can be written as ASCII files with your editor of choice. Here you have the mandatory hello world as written in the MIXAL assembly language:
     *                                                        (1)
     * hello.mixal: say 'hello world' in MIXAL                (2)
     *                                                        (3)
     * label ins    operand     comment                       (4)
     TERM    EQU    19          the MIX console device number (5)
             ORIG   1000        start address                 (6)
     START   OUT    MSG(TERM)   output data at address MSG    (7)
             HLT                halt execution                (8)
     MSG     ALF    "MIXAL"                                   (9)
             ALF    " HELL"                                   (10)
             ALF    "O WOR"                                   (11)
             ALF    "LD   "                                   (12)
             END    START       end of the program            (13)
MIXAL source files should have the extension .mixal when used with the mdk utilities. As you can see in the above sample, each line in a MIXAL file can be divided into four fields separated by an arbitrary amount of whitespace characters (blanks and or tabs). While in Knuth's definition of MIXAL each field must start at a fixed pre-defined column number, the mdk assembler loosens this requirement and lets you format the file as you see fit. The only restrictions retained are for comment lines (like 1-4) which must begin with an asterisk (*) placed at column 1, and for the label field (see below) which, if present, must also start at column 1. The four fields in each non-comment line are:
START and MSG in lines 7 and 9) or a defined symbol
(TERM) (if present, the label must always start at the first
column in its line, for the first whitespace in the line maks the
beginning of the second field),
OUT and HLT in lines 7 and 8 above), or an assembly
pseudoinstruction (e.g., the ORIG pseudoinstruction in line
610.
Lines 9-12 of the hello.mixal file above also show the
second (and last) difference between Knuth's MIXAL definition and ours:
the operand of the ALF pseudoinstruction (a word of five
characters) must be quoted using ""11.
The workings of this sample program should be straightforward if you are familiar with MIXAL. See TAOCP vol. 1 for a thorough definition or MIX and MIXAL tutorial, for a tutorial.
Three simulators of the MIX computer, called mixvm, gmixvm
and mixguile, are included in the mdk tools. They are able to
run binary files containing MIX instructions written in their binary
representation. You can translate MIXAL source files into this binary
form using mixasm, the MIXAL assembler. So, in order to compile
the hello.mixal file, you can type the following command at your
shell prompt:
mixasm hello <RET>
If the source file contains no errors, this will produce a binary file
called hello.mix which can be loaded and run by the MIX virtual
machine. Unless the mixasm option -O is provided, the
assembler will include debug information in the executable file (for a
complete description of all the compilation options, see
mixasm). Now, your are ready to run your first MIX program, as
described in the following section.
MIX is a mythical computer, so it is no use ordering it from your favorite hardware provider. mdk provides three software simulators of the computer, though. They are
mixvm, a command line oriented simulator,
gmixvm, a GTK based graphical interface to mixvm, and
mixguile, a Guile shell with a built-in MIX simulator.
All three simulators accept the same set of user commands, but offer a
different user interface, as noted above. In this section we shall
describe some of these commands, and show you how to use them from
mixvm's command line. You can use them as well at gmixvm's
command prompt (see gmixvm), or using the built-in Scheme primitives
of mixguile (see Using mixguile).
Using the MIX simulators, you can run your MIXAL programs, after
compiling them with mixasm into binary .mix
files. mixvm can be used either in interactive or
non-interactive mode. In the second case, mixvm will load
your program into memory, execute it (producing any output due to
MIXAL OUT instructions present in the program), and exit when
it encounters a HLT instruction. In interactive mode, you will
enter a shell prompt which allows you issuing commands to the running
virtual machine. This commands will permit you to load, run and debug
programs, as well as to inspect the MIX computer state (register
contents, memory cells contents and so on).
To make mixvm work in non-interactive mode, use the -r
flag. Thus, to run our hello.mix program, simply type
mixvm -r hello <RET>
at your command prompt, and you will get the following output:
MIXAL HELLO WORLD
Since our hello world program uses MIX's device number 19 as
its output device (see Writing a source file), the output is
redirected to the shell's standard output. Had you used any other MIX
output devices (disks, drums, line printer, etc.), mixvm would
have created a file named after the device used (e.g. disk4.dev)
and written its output there12.
The virtual machine can also report the execution time of the program,
according to the (virtual) time spent in each of the binary instructions
(see Execution times). Printing of execution time statistics is
activated with the -t flag; running
mixvm -t -r hello <RET>
produces the following output:
     MIXAL HELLO WORLD
     ** Execution time: 11
Sometimes, you will prefer to store the results of your program in MIX
registers rather than writing them to a device. In such cases,
mixvm's -d flag is your friend: it makes mixvm to
dump the contents of its registers and flags after executing the loaded
program. For instance, typing the following command at your shell's
prompt
mixvm -d -r hello
you will obtain the following output:
     MIXAL HELLO WORLD
     rA: + 00 00 00 00 00 (0000000000)
     rX: + 00 00 00 00 00 (0000000000)
     rJ: + 00 00 (0000)
     rI1: + 00 00 (0000)     rI2: + 00 00 (0000)
     rI3: + 00 00 (0000)     rI4: + 00 00 (0000)
     rI5: + 00 00 (0000)     rI6: + 00 00 (0000)
     Overflow: F
     Cmp: E
which, in addition to the program's outputs and execution time, gives you the contents of the MIX registers and the values of the overflow toggle and comparison flag (admittedly, rather uninteresting in our sample).
As you can see, running programs non-interactively has many limitations. You cannot peek the virtual machine's memory contents, not to mention stepping through your program's instructions or setting breakpoints13. Enter interactive mode.
To enter the MIX virtual machine interactive mode, simply type
mixvm <RET>
at your shell command prompt. This command enters the
mixvm command shell. You will be presented the following command
prompt:
MIX >
The virtual machine is initialised and ready to accept your
commands. The mixvm command shell uses GNU's readline, so that
you have at your disposal command completion (using <TAB>) and
history functionality, as well as other line editing shortcuts common to
all utilities using this library (for a complete description of
readline's line editing usage, see Command Line Editing.)
Usually, the first thing you will want to do is loading a compiled MIX
program into memory. This is acomplished by the load command,
which takes as an argument the name of the .mix file to be
loaded. Thus, typing
     MIX > load hello <RET>
     Program loaded. Start address: 3000
     MIX >
will load hello.mix into the virtual machine's memory
and set the program counter to the address of the first instruction. You
can obtain the contents of the program counter using the command
pc:
     MIX > pc
     Current address: 3000
     MIX >
After loading it, you are ready to run the program, using, as you surely
have guessed, the run command:
     MIX > run
     Running ...
     MIXAL HELLO WORLD
     ... done
     Elapsed time: 11 /Total program time: 11 (Total uptime: 11)
     MIX >
Note that now the timing statistics are richer. You obtain the
elapsed execution time (i.e., the time spent executing instructions
since the last breakpoint), the total execution time for the program up
to now (which in our case coincides with the elapsed time, since there
were no breakpoints), and the total uptime for the virtual machine (you
can load and run more than one program in the same
session)14. After
running the program, the program counter will point to the address after
the one containing the HLT instruction. In our case, asking the
value of the program counter after executing the program will give us
     MIX > pc
     Current address: 3002
     MIX >
You can check the contents of a memory cell giving its address
as an argument of the command pmem, like this
     MIX > pmem 3001
     3001: + 00 00 00 02 05 (0000000133)
     MIX >
and convince yourself that address 3001 contains the binary
representation of the instruction HLT. An address range of the
form FROM-TO can also be used as the argument of pmem:
     MIX > pmem 3000-3006
     3000: + 46 58 00 19 37 (0786957541)
     3001: + 00 00 00 02 05 (0000000133)
     3002: + 14 09 27 01 13 (0237350989)
     3003: + 00 08 05 13 13 (0002118477)
     3004: + 16 00 26 16 19 (0268542995)
     3005: + 13 04 00 00 00 (0219152384)
     3006: + 00 00 00 00 00 (0000000000)
     MIX >
In a similar manner, you can look at the contents of the MIX registers and flags. For instance, to ask for the contents of the A register you can type
     MIX > preg A
     rA: + 00 00 00 00 00 (0000000000)
     MIX >
Use the comand help to obtain a list of all available commands,
and help COMMAND for help on a specific command, e.g.
     MIX > help run
     run             Run loaded or given MIX code file. Usage: run [FILENAME]
     MIX >
For a complete list of commands available at the MIX propmt, See mixvm. In the following subsection, you will find a quick tour over commands useful for debugging your programs.
The interactive mode of mixvm lets you step by step execution of
programs as well as breakpoint setting. Use next to step through
the program, running its instructions one by one. To run our
two-instruction hello.mix sample you can do the following:
     MIX > load hello
     Program loaded. Start address: 3000
     MIX > pc
     Current address: 3000
     MIX > next
     MIXAL HELLO WORLD
     Elapsed time: 1 /Total program time: 1 (Total uptime: 1)
     MIX > pc
     Current address: 3001
     MIX > next
     End of program reached at address 3002
     Elapsed time: 10 /Total program time: 11 (Total uptime: 11)
     MIX > pc
     Current address: 3002
     MIX > next
     MIXAL HELLO WORLD
     Elapsed time: 1 /Total program time: 1 (Total uptime: 12)
     MIX >
     MIX > run
     Running ...
     ... done
     Elapsed time: 10 /Total program time: 11 (Total uptime: 22)
     MIX >
(As an aside, the above sample also shows how the virtual machine handles cummulative time statistics and automatic program restart).
You can set a breakpoint at a given address using the command
sbpa (set breakpoint at address). When a breakpoint is set,
run will stop before executing the instruction at the given
address. Typing run again will resume program execution. Coming
back to our hello world example, we would have:
     MIX > sbpa 3001
     Breakpoint set at address 3001
     MIX > run
     Running ...
     MIXAL HELLO WORLD
     ... stopped: breakpoint at line 8 (address 3001)
     Elapsed time: 1 /Total program time: 1 (Total uptime: 23)
     MIX > run
     Running ...
     ... done
     Elapsed time: 10 /Total program time: 11 (Total uptime: 33)
     MIX >
Note that, since we compiled hello.mixal with debug info
enabled, the virtual machine is able to tell us the line in the
source file corresponding to the breakpoint we are setting. As a
matter of fact, you can directly set breakpoints at source code lines
using the command sbp LINE_NO, e.g.
     MIX > sbp 4
     Breakpoint set at line 7
     MIX >
sbp sets the breakpoint at the first meaningful source code line;
thus, in the above example we have requested a breakpoint at a line
which does not correspond to a MIX instruction and the breakpoint is set
at the first line containing a real instruction after the given one. To
unset breakpoints, use cbpa ADDRESS and cbp LINE_NO, or
cabp to remove all currently set breakpoints. You can also set
conditional breakpoints, i.e., tell mixvm to interrupt program
execution whenever a register, a memory cell, the comparison flag or the
overflow toggle change using the commands sbp[rmco]
(see Debug commands).
MIXAL lets you define symbolic constants, either using the EQU
pseudoinstruction or starting an instruction line with a label (which
assigns to the label the value of the current memory address). Each
MIXAL program has, therefore, an associated symbol table which you can
inspect using the psym command. For our hello world sample, you
will obtain the following output:
     MIX > psym
     START:  3000
     TERM:  19
     MSG:  3002
     MIX >
Other useful commands for debugging are strace (which turns on
tracing of executed intructions), pbt (which prints a backtrace
of executed instructions) and weval (which evaluates
w-expressions on the fly). For a complete description of all available
MIX commands, See mixvm.
mixguileWith mixguile you can run a MIX simulator embedded in a Guile
shell, that is, using Scheme functions and programs. As with
mixvm, mixguile can be run both in interactive and
non-interactive modes. The following subsections provide a quick tour on
using this MIX emulator.
mixguile shellmixguile <RET>
at the command prompt, you'll be presented a Guile shell prompt like this
guile>
At this point, you have entered a Scheme read-eval-print loop (REPL)
which offers you all the Guile functionality plus a new set of built-in
procedures to execute and debug MIX programs. Each of the mixvm
commands described in the previous sections (and in see mixvm) have
a Scheme function counterpart named after it by prepending the prefix
mix- to its name. Thus, to load our hello world program, you can
simply enter
     guile> (mix-load "hello")
     Program loaded. Start address: 3000
     guile>
and run it using mix-run:
     guile> (mix-run)
     Running ...
     MIXAL HELLO WORLD
     ... done
     Elapsed time: 11 /Total program time: 11 (Total uptime: 11)
     guile>
In the same way, you can execute it step by step using the Scheme
function mix-next or set a breakpoint:
     guile> (mix-sbp 4)
     Breakpoint set at line 5
     guile>
or, if you one to peek at a register contents:
     guile> (mix-preg 'A)
     rA: + 00 00 00 00 00 (0000000000)
     guile>
You get the idea: you have at your disposal all the mixvm and
gmixvm commands by means of mix- functions. But, in case
you are wondering, this is only the beginning. You also have at your
disposal a whole Scheme interpreter, and you can, for instance, define
new functions combining the mix- and all other Scheme
primitives. In the next sections, you'll find examples of how to take
advantage of the Guile interpreter.
The mix- function counterparts of the mixvm commands don't
return any value, and are evaluated only for their side-effects
(possibly including informational messages to the standard output and/or
error stream). When writting your own Scheme functions to manipulate the
MIX virtual machine within mixguile (see Defining new functions), you'll probably need Scheme functions returning the value
of the registers, memory cells and so on. Don't worry: mixguile
also offers you such functions. For instance, to access the (numerical)
value of a register you can use mix-reg:
     guile> (mix-reg 'I2)
     0
     guile>
Note that, unlike (mix-preg 'I2), the expression (mix-reg
'I2) in the above example evaluates to a Scheme number and does not
produce any side-effect:
     guile> (number? (mix-reg 'I2))
     #t
     guile> (number? (mix-preg 'I2))
     rI2: + 00 00 (0000)
     #f
     guile>
In a similar fashion, you can access the memory contents using
(mix-cell), or the program counter using (mix-loc):
     guile> (mix-cell 3000)
     786957541
     guile> (mix-loc)
     3002
     guile>
Other functions returning the contents of the virtual machine components
are mix-cmp and mix-over, which eval to the value of the
comparison flag and the overflow toggle respectively. For a complete
list of these additional functions, See mixguile.
In the next section, we'll see a sample of using these functions to
extend mixguile's functionality.
Scheme is a powerful language, and you can use it inside mixguile
to easily extend the MIX interpreter's capabilities. For example, you
can easily define a function that loads a file, prints its name,
executes it and, finally, shows the registers contents, all in one shot:
     guile> (define my-load-and-run  <RET>
              (lambda (file)   <RET>
                (mix-load file)   <RET>
                (display "File loaded: ")   <RET>
                (mix-pprog)   <RET>
                (mix-run)   <RET>
                (mix-preg)))   <RET>
     guile>
and use it to run your programs:
     guile> (my-load-and-run "hello")
     Program loaded. Start address: 3000
     File loaded: hello.mix
     Running ...
     MIXAL HELLO WORLD
     ... done
     Elapsed time: 11 /Total program time: 11 (Total uptime: 33)
     rA: + 00 00 00 00 00 (0000000000)
     rX: + 00 00 00 00 00 (0000000000)
     rJ: + 00 00 (0000)
     rI1: + 00 00 (0000)	rI2: + 00 00 (0000)
     rI3: + 00 00 (0000)	rI4: + 00 00 (0000)
     rI5: + 00 00 (0000)	rI6: + 00 00 (0000)
     guile>
Or, maybe, you want a function which sets a breakpoint at a specified line number before executing it:
     guile> (define my-load-and-run-with-bp
              (lambda (file line)
                (mix-load file)
                (mix-sbp line)
                (mix-run)))
     guile> (my-load-and-run-with-bp "samples/primes" 10)
     Program loaded. Start address: 3000
     Breakpoint set at line 10
     Running ...
     ... stopped: breakpoint at line 10 (address 3001)
     Elapsed time: 1 /Total program time: 1 (Total uptime: 45)
     guile>
As a third example, the following function loads a program, runs it and prints the contents of the memory between the program's start and end addresses:
     guile> (define my-run
              (lambda (file)
                (mix-load file)
                (let ((start (mix-loc)))
                  (mix-run)
                  (mix-pmem start (mix-loc)))))
     guile> (my-run "hello")
     Program loaded. Start address: 3000
     Running ...
     MIXAL HELLO WORLD
     ... done
     Elapsed time: 11 /Total program time: 11 (Total uptime: 11)
     3000: + 46 58 00 19 37 (0786957541)
     3001: + 00 00 00 02 05 (0000000133)
     3002: + 14 09 27 01 13 (0237350989)
     guile>
As you can see, the possibilities are virtually unlimited. Of course,
you don't need to type a function definition each time you start
mixguile. You can write it in a file, and load it using Scheme's
load function. For instance, you can create a file named, say,
functions.scm with your definitions (or any Scheme expression)
and load it at the mixguile prompt:
guile> (load "functions.scm")
Alternatively, you can make mixguile to load it for you. When
mixguile starts, it looks for a file named mixguile.scm in
your MDK configuration directory (~/.mdk) and, if it exists,
loads it before entering the REPL. Therefore, you can copy your
definitions in that file, or load the functions.scm file in
mixguile.scm.
Hooks are functions called before or after a given event occurs. In
mixguile, you can define command and break hooks, which are
associated, respectively, with command execution and program
interruption events. The following sections give you a tutorial on using
hook functions within mixguile.
In the previous section, we have seen how to extend mixguile's
functionality through the use of user defined functions. Frequently,
you'll write new functions that improve in some way the workings of a
built-in mixvm command, following this pattern:
We call the functions executed in step (a) pre-hooks, and those of
step post-hooks of the given command. mixguile lets you
specify pre- and post-hooks for any mixvm command using the
mix-add-pre-hook and mix-add-post-hook functions, which
take as arguments a symbol naming the command and a function to be
executed before (resp. after) the command. In other words,
mixguile will execute for you steps (a) and (c) above whenever
you eval (b). The hook functions must take a single argument, which is a
string list of the command's arguments. As an example, let us define the
following hooks for the next command:
     (define next-pre-hook
       (lambda (arglist)
         (mix-slog #f)))

     (define next-post-hook
       (lambda (arglist)
         (display "Stopped at line ")
         (display (mix-src-line-no))
         (display ": ")
         (display (mix-src-line))
         (newline)
         (mix-slog #t)))
In these functions, we are using the function mix-slog to turn
off the informational messages produced by the virtual machine, since we
are providing our own ones in the post hook function. To install these
hooks, we would write:
     (mix-add-pre-hook 'next next-pre-hook)
     (mix-add-post-hook 'next next-post-hook)
Assuming we have put the above expressions in mixguile's
initialisation file, we would obtain the following results when
evaluating mix-next:
     guile> (mix-next)
     MIXAL HELLO WORLD
     Stopped at line 6:             HLT
     guile>
As a second, more elaborated, example, let's define hooks which print
the address and contents of a cell being modified using smem. The
hook functions could be something like this:
     (define smem-pre-hook
       (lambda (arglist)
         (if (eq? (length arglist) 2)
             (begin
               (display "Changing address ")
               (display (car arglist))
               (newline)
               (display "Old contents: ")
               (display (mix-cell (string->number (car arglist))))
               (newline))
             (error "Wrong arguments" arglist))))

     (define smem-post-hook
       (lambda (arglist)
         (if (eq? (length arglist) 2)
             (begin
               (display "New contents: ")
               (display (mix-cell (string->number (car arglist))))
               (newline)))))
and we can install them using
     (mix-add-pre-hook 'smem smem-pre-hook)
     (mix-add-post-hook 'smem smem-post-hook)
Aferwards, a sample execution of mix-smem would look like this:
     guile> (mix-smem 2000 100)
     Changing address 2000
     Old contents: 0
     New contents: 100
     guile>
You can add any number of hooks to a given command. They will be
executed in the same order as they are registered. You can also define
global post (pre) hooks, which will be called before (after) any
mixvm command is executed. Global hook functions must admit two
arguments, namely, a string naming the invoked command and a string list
of its arguments, and they are installed using the Scheme functions
mix-add-global-pre-hook and mix-add-global-post-hook. A
simple example of global hook would be:
     guile> (define pre-hook
              (lambda (cmd args)
                (display cmd)
                (display " invoked with arguments ")
                (display args)
                (newline)))
     guile> (mix-add-global-pre-hook pre-hook)
     ok
     guile> (mix-pmem 120 125)
     pmem invoked with arguments (120-125)
     0120: + 00 00 00 00 00 (0000000000)
     0121: + 00 00 00 00 00 (0000000000)
     0122: + 00 00 00 00 00 (0000000000)
     0123: + 00 00 00 00 00 (0000000000)
     0124: + 00 00 00 00 00 (0000000000)
     0125: + 00 00 00 00 00 (0000000000)
     guile>
Note that if you invoke mixvm commands within a global hook, its
associated command hooks will be run. Thus, if you have installed both
the next hooks described earlier and the global hook above,
executing mix-next will yield the following result:
     guile> (mix-next 5)
     next invoked with arguments (5)
     slog invoked with arguments (off)
     MIXAL HELLO WORLD
     Stopped at line 7: MSG         ALF   "MIXAL"
     slog invoked with arguments (on)
     guile>
Adventurous readers may see the above global hook as the beginning of a command log utility or a macro recorder that saves your commands for replay.
We have seen in the previous section how to associate hooks to command execution, but they are not the whole story. You can also associate hook functions to program interruption, that is, specify functions that should be called every time the execution of a MIX program is stopped due to the presence of a breakpoint, either explicit or conditional. Break hooks take as arguments the line number and memory address at which the break occurred. A simple hook that logs the line and address of the breakpoint could be defined as:
     (define break-hook
       (lambda (line address)
         (display "Breakpoint encountered at line ")
         (display line)
         (display " and address ")
         (display address)
         (newline)))
and installed for explicit and conditional breakpoints using
     (mix-add-break-hook break-hook)
     (mix-add-cond-break-hook break-hook)
after that, every time the virtual machine encounters a breakpoint,
break-code shall be evaluated for you15.
Another useful way of using mixguile is writing executable
scripts that perform a set of commands for you. This is done using the
mixguile switch -s (being a Guile shell, mixguile
accepts all the command options of guile; type mixguile -h
for a list of all available command options). For instance, if you have
a very useful MIX program foo.mix which you want to run often,
you don't have to fire a MIX virtual machine, load and run it every
time; you can write a Scheme script instead:
     #! /usr/bin/mixguile -s
     !#
     ;;; runprimes: execute the primes.mix program

     ;; load the file you want to run
     (mix-load "../samples/primes")
     ;; execute it
     (mix-run)
     ;; print the contents of registers
     (mix-pall)
     ;; ...
Just save the above script to a file named, say, runtest, make it
executable (chmod +x runtest), and, well, execute it from the
Unix shell:
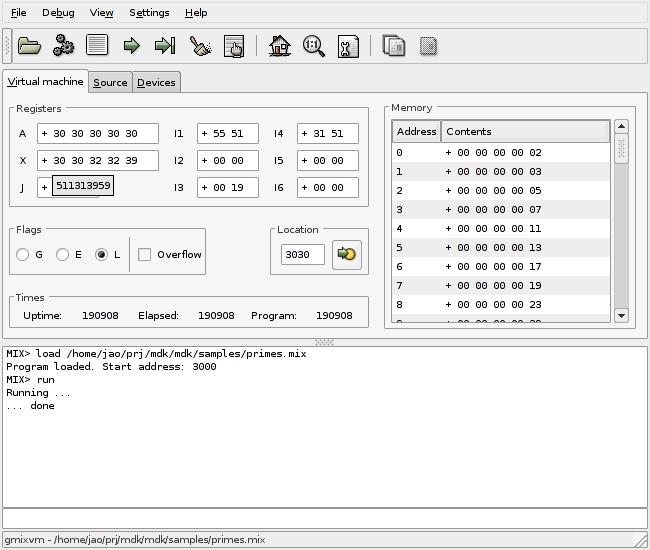
     $ ./runtest
     Program loaded. Start address: 3000
     Running ...
     ... done
     Elapsed time: 190908 /Total program time: 190908 (Total uptime: 190908)
     rA: + 30 30 30 30 30 (0511305630)
     rX: + 30 30 32 32 39 (0511313959)
     rJ: + 47 18 (3026)
     rI1: + 00 00 (0000)     rI2: + 55 51 (3571)
     rI3: + 00 19 (0019)     rI4: + 31 51 (2035)
     rI5: + 00 00 (0000)     rI6: + 00 00 (0000)
     Overflow: F
     Cmp: L
     $
Note that this is far more flexible that running programs
non-interactively using mixvm (see Non-interactive mode), for
you can execute any combination of commands you want from a Scheme
script (not just running and dumping the registers). For additional
mixguile command line options, see Invoking mixguile.
mixvm and gmixvm
In the previous section (see Using mixguile) we have seen how the
Guile shell mixguile offers you the possibility of using Scheme
to manipulate a MIx virtual machine and extend the set of commands
offered by mixvm and gmixvm. This possibility is not
limited to the mixguile shell. Actually, both mixvm and
gmixvm incorporate an embedded Guile interpreter, and can
evaluate Scheme expressions. To evaluate a single-line expression at the
mixvm or gmixvm command prompt, simply write it and press
return (the command parser will recognise it as a Scheme expression
because it is parenthesized, and will pass it to the Guile
interpreter). A sample mixvm session using Scheme expressions
could be:
     MIX > load hello
     Program loaded. Start address: 3000
     MIX > (define a (mix-loc))
     MIX > run
     Running ...
     MIXAL HELLO WORLD
     ... done
     Elapsed time: 11 /Total program time: 11 (Total uptime: 11)
     MIX > (mix-pmem a)
     3000: + 46 58 00 19 37 (0786957541)
     MIX > (mix-pmem (mix-loc))
     3002: + 14 09 27 01 13 (0237350989)
     MIX >
You can also load and evaluate a file, using the scmf
command like this:
MIX> scmf /path/to/file/file.scm
Therefore, you have at your disposal all the mixguile goodies
described above (new functions, new command definitions, hooks...)
inside mixvm and gmixvm. In other words, these programs
are extensible using Scheme. See Using mixguile for examples of
how to do it.
Everyone writing code knows how important a good editor is. Most
systems already come with Emacs, and excellent programmer's editor.
mdk adds support to Emacs for both writing and debugging MIX
programs. A major mode for MIXAL source files eases edition of your
code, while integration with Emacs' debugging interface
(GUD) lets you use mixvm without leaving your
favourite text editor.
This chapter shows how to use the Elisp modules included in mdk, assuming that you have followed the installation instructions in See Emacs support.
The module mixal-mode.el provides a new mode, mixal-mode, for
editing MIXAL source files16. When everything is installed correctly,
Emacs will select it as the major mode for editing files with extension
.mixal. You can also activate mixal-mode in any buffer
issuing the Emacs command M-x mixal-mode.
The mode for editing mixal source files is inherited from fundamental-mode, meaning that all your favorite editing operations will still work. If you want a short introduction to Emacs, type C-h t inside Emacs to start the tutorial.
Mixal mode adds font locking. If you do not have font locking globally enabled, you can turn it on for mixal-mode by placing the following line in your .emacs file:
(add-hook 'mixal-mode-hook 'turn-on-font-lock)
You can also customize the colors used to colour your mixal code by changing the requisite faces. This is the list of faces used by mixal-mode:
When coding your program, you will be thinking, looking up documentation and editing files. Emacs already helps you with editing files, but Emacs can do much more. In particular, looking up documentation is one of its strong points. Besides the info system (which you are probably already using), mixal-mode defines commands for getting particular information about a MIX operation code.
With M-x mixal-describe-operation-code (or its keyboard shortcut
C-h o) you will get the documentation about a particular MIX
operation code. Keep in mind that these are not assembly (MIXAL)
pseudoinstructions. When the point is around a MIXAL
pseudoinstruction in your source file, Emacs will recognize it and
will suggest the right MIX operation code.
After you have written your MIXAL program, you'll probably want to test it. This can be done with the MIX virtual machine. First you will need to compile your code into MIX byte code. This can be done within Emacs with the command M-x compile (C-c c). In case of compilation errors, you can jump to the offending source code line with M-x next-error.
Once the program compiles without errors, you can debug or run
it. To invoke the debugger, use M-x mixal-debug (C-c d).
Emacs will open a GUD buffer where you can
use the debugging commands described in See mixvm.
If you just want to execute the program, you can do so with M-x mixal-run (C-c r). This will invoke mixvm, execute the program and show its output in a separate buffer.
If you are an Emacs user and write your MIXAL programs using this
editor, you will find the elisp program mixvm.el quite
useful17. mixvm.el allows running
the MIX virtual machine mixvm (see mixvm) inside an Emacs
GUD buffer, while visiting the MIXAL source file in another
buffer.
After installing mixvm.el (see Emacs support), you can initiate an mdk/GUD session inside Emacs with the command
M-x mixvm
and you will have a mixvm prompt inside a newly created
GUD buffer. GUD will reflect the current line in the
corresponding source file buffer.
mixasm, the MIXAL assembler
MIX programs, as executed by mixvm, are composed of binary
instructions loaded into the virtual machine memory as MIX
words. Although you could write your MIX programs directly as a series
of words in binary format, you have at your disposal a more friendly
assembly language, MIXAL (see MIXAL) which is compiled into binary
form by mixasm, the MIXAL assembler included in mdk. In this
chapter, you will find a complete description of mixasm options.
mixasmIn its simplest form, mixasm is invoked with a single argument,
which is the name of the MIXAL file to be compiled, e.g.
mixasm hello
will compile either hello or hello.mixal, producing a binary file named hello.mix if no errors are found.
In addition, mixasm can be invoked with the following command
line options (note, that, following GNU's conventions, we provide a long
option name for each available single letter switch):
     mixasm [-vhulO] [-o OUTPUT_FILE] [--version] [--help] [--usage]
            [--ndebug] [--output=OUTPUT_FILE] [--list[=LIST_FILE]] file
The meaning of these options is as follows:
Prints a summary of available options and exits.
Do not include debugging information in the compiled file, saving space but disallowing breakpoint setting at source level and symbol table inspection under
mixvm.
By default, the given source file file.mixal is compiled into file.mix. You can provide a different name for the output file using this option.
This option causes
mixasmto produce, in addion to the .mix file, an ASCII file containing a summary of the compilation results. The file is named after the MIXAL source file, changing its extension to .mls if no argument is provided; otherwise, the listing file is named according to the argument.
mixvm, the MIX computer simulator
This chapter describes mixvm, the MIX computer
simulator. mixvm is a command line interface programme which
simulates the MIX computer (see The MIX computer). It is able
to run MIXAL programs (see MIXAL) previously compiled with the MIX
assembler (see mixasm). The simulator allows inspection of the MIX
computer components (registers, memory cells, comparison flag and overflow
toggle), step by step execution of MIX programmes, and breakpoint
setting to aid you in debugging your code. For a tutorial description of
mixvm usage, See Running the program.
mixvmmixvm can be invoked with the following command line options
(note that, following GNU's conventions, we provide a long option name
for each available single letter switch):
     mixvm [-vhurdtq] [--version] [--help] [--usage] [--run] [--dump]
           [--time] [--noinit]  [FILE[.mix]]
The meaning of these options is as follows:
Prints a summary of available options and exits.
Loads the specified FILE and executes it. After the program execution,
mixvmexits. FILE must be the name of a binary .mix program compiled withmixasm. If your program does not produce any output, use the-dflag (see below) to peek at the virtual machine's state after execution.
This option must be used in conjuction with
-r, and tellsmixvmto print the value of the virtual machine's registers, comparison flag and overflow toggle after executing the program named FILE. See See Non-interactive mode, for sample usage.
This option must be used in conjuction with
-r, and tellsmixvmto print virtual time statistics for the program's execution.
When run without the -r flag, mixvm enters its interactive
mode, showing you a prompt like this one:
MIX >
and waiting for your commands (see Commands). If the optional FILE argument is given, the file FILE.mix will be loaded into the virtual machine memory before entering the interactive mode.
The first time mixvm is invoked, a directory named .mdk is
created in your home directory. It contains the mixvm
configuration file, the command history file and (by default) the block
devices files (see Devices). Before showing you the command prompt,
mixvm looks in the ~/.mdk directory for a file named
mixguile.scm; if it exists, it is read and evaluated by the
embedded Guile interpreter (see Defining new functions). You can use
the -q command line option to skip this file loading:
Do not load the Guile initialisation file
~/.mdk/mixguile.scmat startup.
You can enter the interactive mode of the MIX virtual machine by simply
invoking mixvm without arguments. You will then be greeted by a shell
prompt18
MIX >
which indicates that a new virtual machine has been initialised and is
ready to execute your commands. As we have already mentioned, this
command prompt offers you command line editing facilities which are
described in the Readline user's manual (chances are that you are
already familiar with these command line editing capabilities, as they
are present in many GNU utilities, e.g. the bash
shell)19. In a nutshell, readline provides command completion using the
TAB key and command history using the cursor keys. A history file
containing the last commands typed in previous sessions is stored in the
mdk configuration directory (~/.mdk).
As a beginner, your best friend will be the help command, which
shows you a summary of all available MIX commands and their usage; its
syntax is as follows:
mixvm command: help [command]Prints a short description of the given command and its usage. If command is omitted,
helpprints the short description for all available commands.
You have at your disposal a series of commands that let you load and execute MIX executable files, as well as manipulate MIXAL source files:
This command loads a binary file, file.mix into the virtual machine memory, and positions the program counter at the beginning of the loaded program. This address is indicated in the MIXAL source file as the operand of the
ENDpseudoinstruction. Thus, if your sample.mixal source file contains the line:END 3000and you compile it with
mixasmto produce the binary file sample.mix, you will load it into the virtual machine as follows:MIX > load sample Program loaded. Start address: 3000 MIX >
When executed without argument, this command initiates or resumes execution of instructions from the current program counter address. Therefore, issuing this command after a successful
load, will run the loaded program until either aHLTinstruction or a breakpoint is found. If you provide a MIX filename as argument, the given file will be loaded (as withloadfile) and executed. Ifrunis invoked again after program execution completion (i.e., after theHLTinstruction has been found in a previous run), the program counter is repositioned and execution starts again from the beginning (as a matter of fact, aloadcommand preserving the currently set breakpoints is issued before resuming execution).
The source file file.mixal is edited using the editor defined in the environment variable MDK_EDITOR. If this variable is not set, the following ones are tried out in order: X_EDITOR, EDITOR and VISUAL. If invoked without argument, the source file for the currently loaded MIX file is edited. The command used to edit source files can also be configured using the
seditcommand (see Configuration commands).
The source file file.mixal is compiled (with debug information enabled) using
mixasm. If invoked without argument, the source file for the currently loaded MIX file is recompiled. The compilation command can be set using thesasmcommand (see Configuration commands).
Print the path of the currently loaded MIX program and its source file:
          MIX > load ../samples/primes
          Program loaded. Start address: 3000
          MIX > pprog
          ../samples/primes.mix
          MIX > psrc
          /home/jao/projects/mdk/gnu/samples/primes.mixal
          MIx>
Finally, you can use the quit command to exit mixvm:
Exit
mixvm, saving the current configuration parameters in ~/.mdk/mixvm.config.
Sequential execution of loaded programs can be interrupted using the following debug commands:
This command causes the virtual machine to fetch and execute up to ins_number instructions, beginning from the current program counter position. Execution is interrupted either when the specified number of instructions have been fetched or a breakpoint is found, whatever happens first. If run without arguments, one instruction is executed. If
nextis invoked again after program execution completion (i.e., after theHLTinstruction has been found in a previous run), the program counter is repositioned and execution starts again from the beginning (as a matter of fact, aloadcommand preserving the currently set breakpoints is issued before resuming execution).
Sets a breakpoint at the specified source file line number. If the line specified corresponds to a command or to a MIXAL pseudoinstruction which does not produce a MIX instruction in the binary file (such as
ORIGorEQU) the breakpoint is set at the first source code line giving rise to a MIX instruction after the specified one. Thus, for our sample hello.mixal file:* (1) * hello.mixal: say 'hello world' in MIXAL (2) * (3) * label ins operand comment (4) TERM EQU 19 the MIX console device number (5) ORIG 1000 start address (6) START OUT MSG(TERM) output data at address MSG (7) ...trying to set a breakpoint at line 5, will produce the following result:
          MIX > sbp 5
          Breakpoint set at line 7
          MIX >
since line 7 is the first one compiled into a MIX instruction (at address 3000).
The command
cbpclears a (previously set) breakpoint at the given source file line.
Sets a breakpoint at the given memory address. The argument must be a valid MIX memory address, i.e., it must belong into the range [0-3999]. Note that no check is performed to verify that the specified address is reachable during program execution. No debug information is needed to set a breakpoint by address with
sbpa. The commandcbpaclears a (previously set) breakpoint at the given memory address.
Sets a conditional breakpoint on the specified register change. For instance,
sbpr I1will cause an interruption during program execution whenever the contents or register
I1changes. A previously set breakpoint is cleared using thecbprcommand.
Sets a conditional breakpoint on the specified memory cell change. The argument must be a valid MIX memory address, i.e., it must belong into the range [0-3999]. For instance,
sbpm 1000will cause an interruption during program execution whenever the contents or of the memory cell number 1000 changes. A previously set breakpoint is cleared using the
cbpmcommand.
Sets/clears a conditional breakpoint on overflow toggle change.
Sets/clears a conditional breakpoint on comparison flag change.
MIXAL programs can define symbolic constants, using either the
EQUpseudoinstruction or a label at the beginning of a line. Thus, in the program fragmentVAR EQU 2168 ORIG 4000 START LDA VARthe symbol
VARstands for the value 2168, whileSTARTis assigned the value 4000. The symbol table can be consulted from themixvmcommand line usingpsymfollowed by the name of the symbol whose contents you are interested in. When run without arguments,psymwill print all defined symbols and their values.
The virtual machine can also show you the instructions it is executing, using the following commands:
strace onenables instruction tracing. When tracing is enabled, each time the virtual machine executes an instruction (due to your issuing arunornextcommand), it is printed in its canonical form (that is, with all expressions evaluated to their numerical values) and, if the program was compiled with debug information, as it was originally typed in the MIXAL source file. Instruction tracing is disabled withstrace offcommand. A typical tracing session could be like this:MIX > strace on MIX > next 3000: [OUT 3002,0(2:3)] START OUT MSG(TERM) MIXAL HELLO WORLD Elapsed time: 1 /Total program time: 1 (Total uptime: 1) MIX > next 3001: [HLT 0,0] HLT End of program reached at address 3002 Elapsed time: 10 /Total program time: 11 (Total uptime: 11) MIX > strace off MIX >The executed instruction, as it was translated, is shown between square brackets after the memory address, and, following it, you can see the actual MIXAL code that was compiled into the executed instruction. The tracing behaviour is stored as a configuration parameter in ~/.mdk.
Prints the requested source line (or the current one if line_number is omitted:
          MIX > load ../samples/hello
          Program loaded. Start address: 3000
          MIX > pline
          Line 5: START       OUT   MSG(TERM)
          MIX > pline 6
          Line 6:             HLT
          MIX >
This command prints a backtrace of executed instructions. Its optional argument ins_number is the number of instructions to print. If it is omitted or equals zero, all executed instructions are printed. For instance, if you compile and load the following program (bt.mixal):
              ORIG 0
          BEG JMP *+1
              JMP *+1
          FOO JMP BAR
          BAR HLT
              END BEG
you could get the following traces:
          MIX > load bt
          Program loaded. Start address: 0
          MIX > next
          MIX > pbt
          #0      BEG     in bt.mixal:2
          MIX > next
          MIX > pbt
          #0      1       in bt.mixal:3
          #1      BEG     in bt.mixal:2
          MIX > run
          Running ...
          ... done
          MIX > pbt 3
          #0      BAR     in bt.mixal:5
          #1      FOO     in bt.mixal:4
          #2      1       in bt.mixal:3
          MIX > pbt
          #0      BAR     in bt.mixal:5
          #1      FOO     in bt.mixal:4
          #2      1       in bt.mixal:3
          #3      BEG     in bt.mixal:2
          MIX >
Note that the executed instruction trace gives you the label of the executed line or, if it has no label, its address.
As you have probably observed, mixvm prints timing statistics
when running programs. This behaviour can be controlled using the
stime command (see Configuration commands).
mixvm is also able of evaluating w-expressions
(see W-expressions) using the following command:
Evaluates the given w-expression, WEXP. The w-expression can contain any currently defined symbol. For instance:
          MIX > psym START
          + 00 00 00 46 56 (0000003000)
          MIX > weval START(0:1),START(3:4)
          + 56 00 46 56 00 (0939716096)
          MIX >
New symbols can be defined using the ssym command:
Defines the symbol named SYM with the value resulting from evaluating WEXP, an w-expression. The newly defined symbol can be used in subsequent
wevalcommands, as part of the expression to be evaluated. E.g.,MIX > ssym S 2+23*START + 00 00 18 19 56 (0000075000) MIX > psym S + 00 00 18 19 56 (0000075000) MIX > weval S(3:4) + 00 00 19 56 00 (0000081408) MIX >
Finally, if you want to discover which is the decimal value of a MIX word expressed as five bytes plus sign, you can use
Computes the decimal value of the given word. WORD must be expressed as a sign (+/-) followed by five space-delimited, two-digit decimal values representing the five bytes composing the word. The reverse operation (showing the word representation of a decimal value) can be accomplished with
weval. For instance:MIX > w2d - 01 00 00 02 02 -16777346 MIX > weval -16777346 - 01 00 00 02 02 (0016777346) MIX >
Inspection and modification of the virtual machine state (memory, registers, overflow toggle and comparison flag contents) is accomplished using the following commands:
This commands prints the current virtual machine state, which can be one of the following:
- No program loaded
- Program successfully loaded
- Execution stopped (
nextexecuted)- Execution stopped: breakpoint encountered
- Execution stopped: conditional breakpoint encountered
- Program successfully terminated
Prints the current value of the program counter, which stores the address of the next instruction to be executed in a non-halted program.
pregprints the contents of a given MIX register. For instance,pregA will print the contents of the A-register. When invoked without arguments, all registers shall be printed:MIX > preg rA: - 00 00 00 00 35 (0000000035) rX: + 00 00 00 15 40 (0000001000) rJ: + 00 00 (0000) rI1: + 00 00 (0000) rI2: + 00 00 (0000) rI3: + 00 00 (0000) rI4: + 00 00 (0000) rI5: + 00 00 (0000) rI6: + 00 00 (0000) MIX >As you can see in the above sample, the contents is printed as the sign plus the values of the MIX bytes stored in the register and, between parenthesis, the decimal representation of its module.
pallprints the contents of all registers plus the comparison flag and overflow toggle.Finally,
sregSets the contents of the given register to value, expressed as a decimal constant. If value exceeds the maximum value storable in the given register,VALUE mod MAXIMU_VALUEis stored, e.g.MIX > sreg I1 1000 MIX > preg I1 rI1: + 15 40 (1000) MIX > sreg I1 1000000 MIX > preg I1 rI1: + 09 00 (0576) MIX >
pflagsprints the value of the comparison flag and overflow toggle of the virtual machine, e.g.MIX > pflags Overflow: F Cmp: E MIX >The values of the overflow toggle are either F (false) or T (true), and, for the comparison flag, E, G, L (equal, greater, lesser).
scmpandsoverare setters of the comparison flag and overflow toggle values.
pmemprints the contents of memory cells in the address range [FROM-TO]. If the upper limit to is omitted, only the contents of the memory cell with address FROM is printed, as inMIX > pmem 3000 3000: + 46 58 00 19 37 (0786957541) MIX >The memory contents is displayed both as the set of five MIX bytes plus sign composing the stored MIX word and, between parenthesis, the decimal representation of the module of the stored value.
smemsets the content of the memory cell with address address to value, expressed as a decimal constant.
This section describes commands that allow you to configure the virtual machine behaviour. This configuration is stored in the mdk directory ~/.mdk.
As you can see in their description, some commands print, as a side
effect, informational messages to the standard output (e.g. load
prints a message telling you the loaded program's start address): these
messages can be enabled/disabled using slog:
Turns on/off the logging of informational messages. Note that error messages are always displayed, as well as state messages required using commands prefixed with
p(preg,pmemand the like).
The
stimecommand (un)sets the printing of timing statistics, andptimeprints their current value:MIX > ptime Elapsed time: 10 /Total program time: 11 (Total uptime: 11) MIX >
seditsets the command to be used to edit MIXAL source files with theeditcommand. TEMPLATE must contain the control characters%sto mark the place where the source's file name will be inserted. For instance, if you typeMIX > sedit emacsclient %s MIX >issuing the
mixvmcommandedit foo.mixalwill invoke the operating system commandemacsclient foo.mixal.
peditprints the current value of the edit command template.
sasmsets the command to be used to compile MIXAL source files with thecompilecommand. template must contain the control characters%sto mark the place where the source's file name will be inserted. For instance, if you typeMIX > sasm mixasm -l %s MIX >issuing the
mixvmcommandcompile foo.mixalwill invoke the operating system commandmixasm -l foo.mixal.
pasmprints the current value of the compile command template.
MIX devices (see Devices) are implemented as regular files stored, by default, inside ~/.mdk. The
sddircommand lets you specify an alternative location for storing these device files, whilepddirprints the current device directory.
Finally, you can change the default command prompt, `MIX > ',
using the prompt command:
Changes the command prompt to prompt. If you want to include white space(s) at the end of the new prompt, bracket prompt using double quotes (e.g.,
prompt ">> ").
If you have compiled mdk with libguile support
(see Special configure flags), mixvm will start and
initialise an embedded Guile Scheme interpret when it is invoked. That
means that you have at your disposal, at mixvm's command prompt,
all the Scheme primitives described in Using mixguile and
mixguile, as well as any other function or hook that you have
defined in the initialisation file ~/.mdk/mixguile.scm. To
evaluate a Scheme function, simply type it at the mixvm command
prompt (see Using Scheme in mixvm and gmixvm for a
sample). Compared to the mixguile program, this has only one
limitation: the expressions used in mixvm cannot span more than
one line. You can get over this inconvenience writing your multiline
Scheme expressions in a file and loading it using the scmf
command:
Loads the given Scheme file and evaluates it using the embedded Guile interpreter.
The MIX computer comes equipped with a set of block devices for
input-output operations (see Input-output operators). mixvm
implements these block devices as disk files, with the exception of
block device no. 19 (typewriter terminal) which is redirected to
standard input/output. When you request an output operation on any other
(output) device, a file named according to the following table will be
created, and the specified MIX words will be
written to the file in binary form (for binary devices) or in ASCII (for
char devices). Files corresponding to input block devices should be
created and filled beforehand to be used by the MIX virtual machine (for
input-output devices this creation can be accomplished by a MIXAL
program writing to the device the required data, or, if you prefer, with
your favourite editor). The device files are stored, by default, in the
directory ~/.mdk; this location can be changed using the
mixvm command devdir (see Configuration commands).
| Device | No. | filename | type and block size
|
| Tape | 0-7 | tape[0-7].dev | bin i/o - 100 words
|
| Disks | 8-15 | disk[0-7].dev | bin i/o - 100 words
|
| Card reader | 16 | cardrd.dev | char in - 16 words
|
| Card writer | 17 | cardwr.dev | char out - 16 words
|
| Line printer | 18 | printer.dev | char out - 24 words
|
| Terminal | 19 | stdin/stdout | char i/o - 14 words
|
| Paper tape | 20 | paper.dev | char in - 14 words
|
Devices of type char are stored as ASCII files, using one line per block. For instance, since the card reader has blocks of size 16, that is, 80 characters, it will be emulated by an ASCII file consisting of lines with length 80. If the reader finds a line with less than the required number of characters, it pads the memory with zeroes (MIX character 'space') to complete the block size.
Note that the virtual machine automatically converts between the MIX and ASCII character encodings, so that you can manipulate char device files with any ASCII editor. In addition, the reader is not case-sensitive, i.e., it automatically converts lowercase letters to their uppercase counterparts (since the MIX character set does not include the former).
The typewriter (device no. 19) lets you use the standard input and output in your MIXAL programs. For instance, here is a simple 'echo' program:
     * simple echo program
     TERM    EQU     19          the typewriter device
     BUF     EQU     500         input buffer
             ORIG    1000
     START   IN      BUF(TERM)   read a block (70 chars)
             OUT     BUF(TERM)   write the read chars
             HLT
             END     START
Input lines longer than 70 characters (14 words) are trimmed. On the other hand, if you type less than a block of characters, whitespace (MIX character zero) is used as padding.
gmixvm, the GTK virtual machine
This chapter describes the graphical MIX virtual machine emulator
shipped with mdk. In addition to having all the command-oriented
functionalities of the other virtual machines (mixvm and
mixguile), gmixvm offers you a graphical interface
displaying the status of the virtual machine, the source code of the the
downloaded programs and the contents of the MIX devices.
gmixvmIf you have built mdk with GTK+ support (see Installing MDK), a graphical front-end for the MIX virtual machine will be available in your system. You can invoke it by typing
gmixvm [-vhuq] [--version] [--help] [--usage] [--noinit]
at your command prompt, where the options have the following meanings:
Prints a summary of available options and exits.
Do not load the Guile initialisation file
~/.mdk/mixguile.scmat startup. This file contains any local Scheme code to be executed by the embedded Guile interpreter at startup (see Using Scheme in mixvm and gmixvm).
Typing gmixvm or gmixvm -q at your command prompt, the
main window will appear, offering you a graphical interface to run and
debug your MIX programs.
Apart from the menu and status bars, we can distinguish two zones (or
halves) in this main window. In the upper half of gmixvm's main
window there is a notebook with three pages, namely,
These three windows can be detached from the notebook, using either
the penultimate toolbar button (which detachs the currently visible
notebook page) or the menu entries under View->Detached windows.
Here is an screenshot showing how gmixvm looks like when running
with a couple of detached windows:
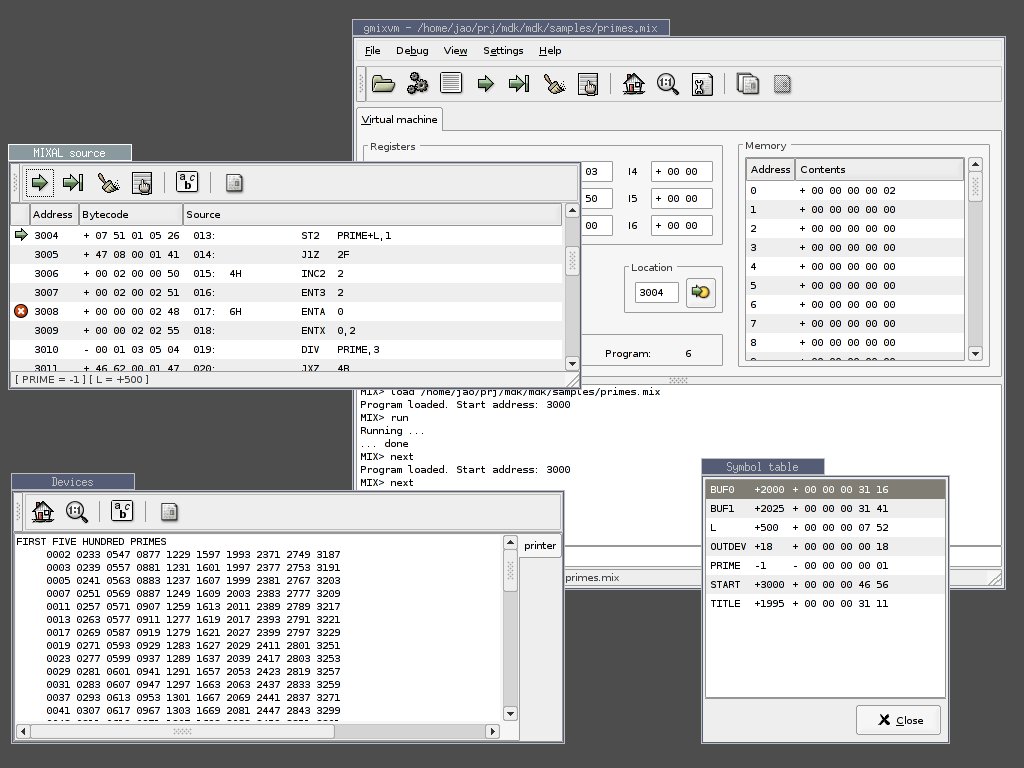
On the other hand, the main window's lower half presents you a
mixvm command prompt and a logging area where results of the
issued commands are presented. These widgets implement a mixvm
console which offers almost the same functionality as its
CLI counterpart.
When gmixvm is run, it creates a directory named .mdk in
your home directory (if it does not already exist). The .mdk
directory contains the program settings, the device files used by your
MIX programs (see Devices), and a command history file.
The following sections describe the above mentioned components of
gmixvm.
In the lower half of the gmixvm main window, you will find a
command text entry and, above it, an echo area. These widgets offer you
the same functionality as its CLI counterpart, mixvm
(see mixvm). You can issue almost all mixmv commands at the
gmixvm's command prompt in order to manipulate the MIX virtual
machine. Please refer to See mixvm, for a description of these
commands, and to See Getting started, for a tutorial on using the MIX
virtual machine. The command prompt offers command line completion for
partially typed commands using the <TAB> key; e.g., if you type
lo <TAB>
the command is automatically completed to load. If multiple
completions are available, they will be shown in the echo area. Thus,
typing
p <TAB>
will produce the following output on the echo area:
     Completions:
     pc     psym     preg     pflags     pall
     pmem
which lists all the available commands starting with p. In
addition, the command prompt maintains a history of typed commands,
which can be recovered using the arrow up and down keys. As mentioned
above, a file containing previous sessions' commands is stored in the
configuration directory ~/.mdk, and reloaded every time you start
gmixvm.
You can change the font used to display the issued commands and the
messages in the echo area using the Settings->Change font->Command prompt and Settings->Change font->Command log menu commands.
The first notebook's page displays the current status of the virtual machine. There you can find the registers' contents, the value of the comparison and overflow flags, the location pointer, a list with all MIX memory cells and their contents, and the time statistics (including total uptime, elapsed time since the last run command and total execution time for the currently loaded MIX program).
If you click any register entry, you will be prompted for a new register's contents.
The next figure shows the enter word dialog.
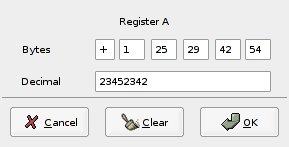
In the same manner, click on any address of the memory cells list to be prompted for the new contents of the clicked cell. If you click the address column's title, a dialog asking you for a memory address will appear; if you introduce a valid address, this will be the first cell displayed in the scrollable list after you click the OK button.
The register contents are shown as a list of MIX bytes plus sign. If you place the mouse pointer over any of them, the decimal value of this MIX word will appear inside a tooltip.
You can change the font used to display the MIX virtual machine contents
using the Settings->Change font->MIX menu command.
The second notebook's page, dubbed Source, shows you the MIXAL source of the currently loaded MIX file.
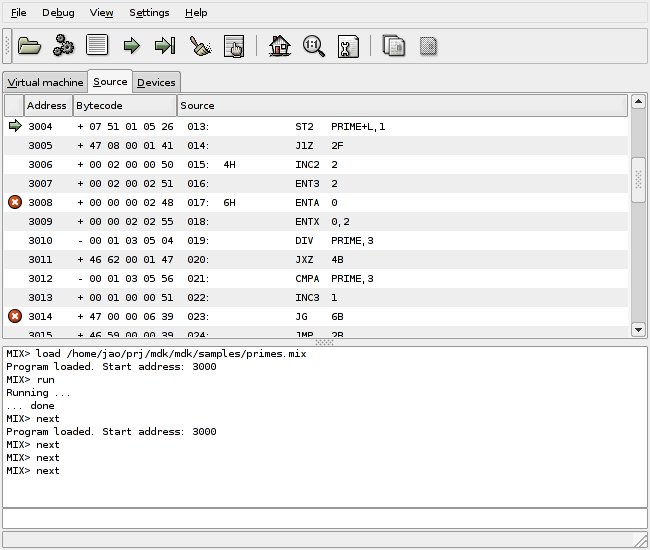
The information is presented in four columns. The first column displays little icons showing the current program pointer and any set breakpoints. The second and third columns show the address and memory contents of the compiled MIX instruction, while the last one displays its corresponding MIXAL representation, together with the source file line number. You can set/unset breakpoints by clicking on any line that has an associated memory address.
You can change the font used to display the MIXAL source code
using the Settings->Change font->MIXAL menu command.
The last notebook page, dubbed Devices, shows you the output/input to/from MIX block devices (the console, line printer, paper tape, disks, card and tapes see Devices) produced by the running program.
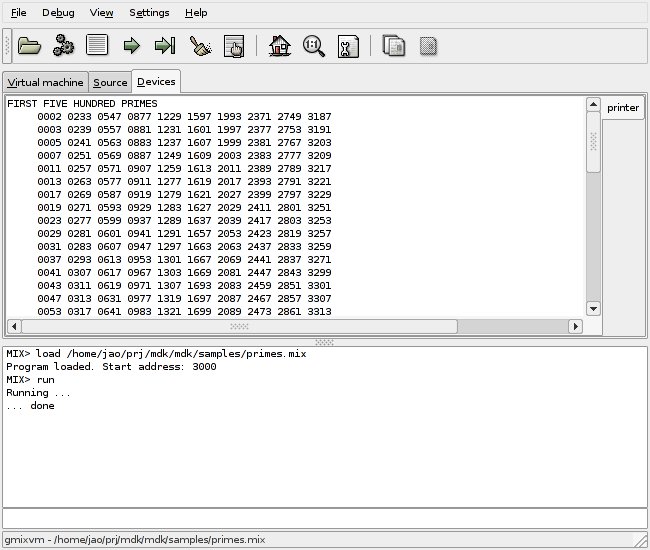
Input device contents is read from files located in the ~/.mdk directory, and the output is also written to files at the same location. Note that device tabs will appear as they are used by the MIX program being run, and that loading a new MIX program will close all previously open devices.
The input/output for binary block devices (tapes and disks) is a list
of MIX words, which can be displayed either in decimal or word format
(e.g. - 67 or - 00 00 00 01 03). The format used by
gmixvm can be configured using the Settings->Device output
menu command for each binary device.
You can change the font used to display the devices content
using the Settings->Change font->Devices menu command.
The menu bar gives you access to the following commands:
Opens a file dialog that lets you specify a binary MIX file to be loaded in the virtual machine's memory. It is equivalent to the
mixvm'sloadcommand (see File commands).
Opens a file dialog that lets your specify a MIXAL source file to be edited. It is equivalent to the
mixvm'seditcommand (see File commands). The program used for editing can be specified using the menu entrySettings->External programs, or using themixvmcommandsedit.
Opens a file dialog that lets your specify a MIXAL source file to be compiled. It is equivalent to the
mixvm'scompilecommand (see File commands). The command used for compiling can be specified using the menu entrySettings->External programs, or using themixvmcommandsasm.
Runs the currently loaded MIX program, up to the next breakpoint. It is equivalent to the
mixvm'sruncommand (see Debug commands).
Executes the next MIX instruction. It is equivalent to the
mixvm'snextcommand (see Debug commands).
Clears all currently set breakpoints. It is equivalent to the
mixvm'scabpcommand.
Opens a dialog showing the list of symbols defined in the currently loaded MIX program. The font used to display this list can be customised using the meny entry
Settings->Change font->Symbol list.
Toggles the toolbar(s) in the
gmixvmwindow(s) (when notebook pages are detached, each one has its own toolbar).
These toggles let you detach (or re-attach) the corresponding notebook page.
Lets you change the font used in the various
gmixvwidgets (i.e. commad prompt, command log, Virtual machine, Source, Devices and Symbol list). There is also an entry (All) to change all fonts at once.
Opens a dialog that lets you specify which format shall be used to show the contents of MIX binary block devices.
The available formats are decimal (e.g. -1234) and MIX word (e.g. - 00 00 00 19 18).
Opens a dialog that lets you choose where the MIX device files will be stored (~/.mdk is the default location).
You can also specify the devices directory using the
mixvmcommandsddir(see Configuration commands).
This menu command opens a dialog that lets you specify the commands used for editing and compiling MIXAL source files.
The commands are specified as template strings, where the control substring
%swill be substituted by the actual file name. Thus, if you want to edit programs usingvirunning in anxterm, you must enter the command templatexterm -e vi %sin the corresponding dialog entry. These settings can also be changed using themixvmcommandsseditandsasm(see Configuration commands).
Mark this checkbox if you want
gmixvmto save its settings every time you quit the program.
On the other hand, the status bar displays the name of the last loaded MIX file. In addition, when the mouse pointer is over a MIXAL source file line that contains symbols, a list of these symbols with their values will appear in the status bar.
mixguile, the Scheme virtual machine
This chapter provides a reference to using mixguile and the
Scheme function library giving access to the MIX virtual machine in the
mdk emulators (mixguile, mixvm and gmixvm). See
Using mixguile for a tutorial, step by step introduction to
mixguile and using Scheme as an extension language for the
mdk MIX virtual machines.
mixguile
Invoking mixguile without arguments will enter the Guile REPL
(read-eval-print loop) after loading, if it exists, the user's
initialisation file (~/.mdk/mixguile.scm).
mixguile accepts the same command line options than Guile:
     mixguile [-s SCRIPT] [-c EXPR] [-l FILE] [-e FUNCTION] [-qhv]
              [--help] [--version]
The meaning of these options is as follows:
Loads Scheme code from script, evaluates it and exits. This option can be used to write executable Scheme scripts, as described in Scheme scripts.
After reading the script, executes the given function using the provided command line arguments. For instance, you can write the following Scheme script:
          #! /usr/bin/mixguile \
          -e main -s
          !#

          ;;; execute a given program and print the registers.

          (define main
            (lambda (args)
              ;; load the file provided as a command line argument
              (mix-load (cadr args))
              ;; execute it
              (mix-run)
              ;; print the contents of registers
              (mix-pall)))
save it in a file called, say, foo, make it executable, and run it as
$ ./foo helloThis invocation will cause the evaluation of the
mainfunction with a list of command line parameters as its argument (("./foo" "hello")in the above example. Note that command line options to mixguile must be written in their own line after the\symbol.
Do not load user's initialisation file. When
mixguilestarts up, it looks for a file named mixguile.scm in the user's mdk configuration directory (~/.mdk), and loads it if it exists. This option tellsmixguileto skip this initialisation file loading.
As we have previously pointed out, mixguile embeds a MIX virtual
machine that can be accessed through a set of Scheme functions, that is,
of a Scheme library. Conversely, mixvm and gmixvm contain
a Guile interpreter, and are able to use this same Scheme library, as
well as all the other Guile/Scheme primitives and any user defined
function. Therefore, you have at your disposal a powerful programming
language, Scheme, to extend the mdk virtual machine emulators (see
Using Scheme in mixvm and gmixvm for samples of how to do it).
The following subsections describe available functions the MIX/Scheme library.
mixvm command wrappersFor each of the mixvm commands listed in Commands, there is
a corresponding Scheme function named by prefixing the command name with
mix- (e.g., mix-load, mix-run and so on). These
command wrappers are implemented using a generic command dispatching
function:
Dispatchs the given command to the MIX virtual appending the provided argument. Both command and
argumentmust be strings. The net result is as writing "command argument" at themixvmorgmixvmcommand prompt.
For instance, you can invoke the run command at the mixvm
prompt in three equivalent ways:
     MIX > run hello
     MIX > (mix-run "hello")
     MIX > (mixvm-cmd "run" "hello")
(only the two last forms can be used at the mixguile prompt or
inside a Scheme script).
The mix- functions evaluate to a unspecified value. If you want
to check the result of the last mixvm command invocation, use the
mix-last-result function:
Returns #t if the last
mixvmcommand invocation was successful, #f otherwise.
     #! /usr/bin/mixguile \
     -e main -s
     !#

     ;;; Execute a given program and print the registers.

     (define main
       (lambda (args)
         ;; load the file provided as a command line argument
         (mix-load (cadr args))
         ;; execute it if mix-load succeeded
         (if (mix-last-result) (mix-run))
         ;; print the contents of registers if the above commands succeded
         (if (mix-last-result) (mix-pall))))
Please, refer to Commands for a list of available commands. Given
the description of a mixvm, it is straightforward to use its
Scheme counterpart and, therefore, we shall not give a complete
description of these functions here. Instead, we will only mention those
wrappers that exhibit a treatment of their differing from that of their
command counterpart.
The argument register of these functions can be either a string or a symbol representing the desired register. For instance, the following invocations are equivalent:
          (mix-preg 'I1)
          (mix-preg "I1")
The command
pmemtakes a single argument which can be either a cell number or a range of the formFROM-TO. This function takes one argument to ask for a single memory cell contents, or two parameters to ask for a range. For instance, the following commands are equivalent:MIX > pmem 10-12 0010: + 00 00 00 00 00 (0000000000) 0011: + 00 00 00 00 00 (0000000000) 0012: + 00 00 00 00 00 (0000000000) MIX > (mix-pmem 10 12) 0010: + 00 00 00 00 00 (0000000000) 0011: + 00 00 00 00 00 (0000000000) 0012: + 00 00 00 00 00 (0000000000) MIX >
The command
sovertakes as argument either the stringTor the stringF, to set, respectively, the overflow toggle to true or false. Its Scheme counterpart,mix-sover, takes as argument a Scheme boolean value:#t(true) or#f.
For the remaining functions, you simply must take into account that when the command arguments are numerical, the corresponding Scheme function takes as arguments Scheme number literals. On the other hand, when the command argument is a string, the argument of its associated Scheme function will be a Scheme string. By way of example, the following invocations are pairwise equivalent:
     MIX > load ../samples/hello
     MIX > (mix-load "../samples/hello")

     MIX > next 5
     MIX > (mix-next 5)
Hooks are functions evaluated before or after executing a mixvm
command (or its corresponding Scheme function wrapper), or after an
explicit or conditional breakpoint is found during the execution of a
MIX program. The following functions let you install hooks:
Adds a function to the list of pre-hooks associated with the give command. command is a string naming the corresponding
mixvmcommand, and hook is a function which takes a single argument: a string list of the commands arguments. The following scheme code defines a simple hook and associates it with theruncommand:(define run-hook (lambda (args) (display "argument list: ") (display args) (newline))) (mix-add-pre-hook "run" run-hook)Pre-hooks are executed, in the order they are added, before invoking the corresponding command (or its associated Scheme wrapper function).
Adds a function to the list of pre-hooks associated with the give command. The arguments have the same meaning as in
mix-add-pre-hook.
Global pre/post hooks are executed before/after any
mixvmcommand or function wrapper invocation. In this case, hook takes two arguments: a string with the name of the command being invoked, and a string list with its arguments.
Add a hook funtion to be executed when an explicit (resp. conditional) breakpoint is encountered during program execution. hook is a function taking two arguments: the source line number where the hook has occurred, and the current program counter value. The following code shows a simple definition and installation of a break hook:
          (define break-hook
            (lambda (line address)
              (display "Breakpoint at line ") (display line)
              (display " and address ") (display address)
              (newline)))
          (mix-add-break-hook break-hook)
Break hook functions are entirely implemented in Scheme using regular post-hooks for the
nextandruncommands. If you are curious, you can check the Scheme source code at prefix/share/mdk/mixguile-vm-stat.scm (where prefix stands for your root install directory, usualy/usror/usr/local.
See Hook functions for further examples on using hook functions.
When writing non-trivial Scheme extensions using the MIX/Scheme library,
you will probably need to evaluate the contents of the virtual machine
components (registers, memory cells and so on). For instance, you may
need to store the contents of the A register in a variable. The
Scheme functions described so far are of no help: you can print the
contents of A using (mix-preg 'A), but you cannot define a
variable containing the contents of A. To address this kind of
problems, the MIX/Scheme library provides the following additional
functions:
Return the current status of the virtual machine, as a number (
mixvm-status) or as a symbol (mix-vm-status). Posible return values are:
(mixvm-status)(mix-vm-status)0 MIX_ERROR Loading or execution error 1 MIX_BREAK Breakpoint encountered 2 MIX_COND_BREAK Conditional breakpoint 3 MIX_HALTED Execution terminated 4 MIX_RUNNING Execution stopped after next5 MIX_LOADED Program successfully loaded 6 MIX_EMPTY No program loaded
Predicates asking whether the current virtual machine status is
MIX_ERROR,MIX_BREAK, etc.
mix-regevaluates to a number which is the contents of the specified register.mix-set-regsets the contents of the given register to value. The register can be specified either as a string ("A","X", etc.) or as a symbol ('A,'X, etc.). For instance,guile> (mix-reg 'A) 2341 guile> (mix-set-reg! "A" 2000) ok guile> (define reg-a (mix-reg 'A)) guile> (display reg-a) 2000 guile>
Evaluate and set the contents of the memory cell number cell_no. Both cell_no and value are Scheme numbers.
Evaluates to the value of the location counter (i.e., the address of the next instruction to be executed).
mix-overevaluates to#tif the overflow toggle is set, and to#fotherwise. The value of the overflow toggle can be modified usingmix-set-over!.
Evaluate and set the comparison flag. Possible values are the scheme symbols
L(lesser),E(equal) andG(greater).
Evaluates to the current virtual machine lapsed time, i.e., the time elapsed since the last
runornextcommand.
Evaluates to a string containing the basename (without any leading path) of the currently loaded MIX program.
Evaluates to a string containing the full path to the currently loaded MIX program.
Evaluates to a string containing the full path to the source file of the currently loaded MIX program.
mix-src-line-noevaluates to the current source file number during the execution of a program.mix-src-lineevaluates to a string containing the source file line number lineno; when invoked without argument, it evaluates to(mix-src-line (mix-src-line-no)).
Evaluates to a string containing the full path of the current device directory.
If you have any questions, comments or suggestions, please send electronic mail to the author.
If you find a bug in mdk, please send electronic mail to the mdk bug list.
In your report, please include the version number, which you can find by running `mixasm --version'. Also include in your message the output that the program produced and the output you expected.
GNU MDK is distributed under the GNU General Public License (GPL) and this manual under the GNU Free Documentation License (GFDL).
     Copyright © 1989, 1991 Free Software Foundation, Inc.
     51 Franklin Street, Fifth Floor, Boston, MA  02110-1301, USA

     Everyone is permitted to copy and distribute verbatim copies
     of this license document, but changing it is not allowed.
The licenses for most software are designed to take away your freedom to share and change it. By contrast, the GNU General Public License is intended to guarantee your freedom to share and change free software—to make sure the software is free for all its users. This General Public License applies to most of the Free Software Foundation's software and to any other program whose authors commit to using it. (Some other Free Software Foundation software is covered by the GNU Library General Public License instead.) You can apply it to your programs, too.
When we speak of free software, we are referring to freedom, not price. Our General Public Licenses are designed to make sure that you have the freedom to distribute copies of free software (and charge for this service if you wish), that you receive source code or can get it if you want it, that you can change the software or use pieces of it in new free programs; and that you know you can do these things.
To protect your rights, we need to make restrictions that forbid anyone to deny you these rights or to ask you to surrender the rights. These restrictions translate to certain responsibilities for you if you distribute copies of the software, or if you modify it.
For example, if you distribute copies of such a program, whether gratis or for a fee, you must give the recipients all the rights that you have. You must make sure that they, too, receive or can get the source code. And you must show them these terms so they know their rights.
We protect your rights with two steps: (1) copyright the software, and (2) offer you this license which gives you legal permission to copy, distribute and/or modify the software.
Also, for each author's protection and ours, we want to make certain that everyone understands that there is no warranty for this free software. If the software is modified by someone else and passed on, we want its recipients to know that what they have is not the original, so that any problems introduced by others will not reflect on the original authors' reputations.
Finally, any free program is threatened constantly by software patents. We wish to avoid the danger that redistributors of a free program will individually obtain patent licenses, in effect making the program proprietary. To prevent this, we have made it clear that any patent must be licensed for everyone's free use or not licensed at all.
The precise terms and conditions for copying, distribution and modification follow.
Activities other than copying, distribution and modification are not covered by this License; they are outside its scope. The act of running the Program is not restricted, and the output from the Program is covered only if its contents constitute a work based on the Program (independent of having been made by running the Program). Whether that is true depends on what the Program does.
You may charge a fee for the physical act of transferring a copy, and you may at your option offer warranty protection in exchange for a fee.
These requirements apply to the modified work as a whole. If identifiable sections of that work are not derived from the Program, and can be reasonably considered independent and separate works in themselves, then this License, and its terms, do not apply to those sections when you distribute them as separate works. But when you distribute the same sections as part of a whole which is a work based on the Program, the distribution of the whole must be on the terms of this License, whose permissions for other licensees extend to the entire whole, and thus to each and every part regardless of who wrote it.
Thus, it is not the intent of this section to claim rights or contest your rights to work written entirely by you; rather, the intent is to exercise the right to control the distribution of derivative or collective works based on the Program.
In addition, mere aggregation of another work not based on the Program with the Program (or with a work based on the Program) on a volume of a storage or distribution medium does not bring the other work under the scope of this License.
The source code for a work means the preferred form of the work for making modifications to it. For an executable work, complete source code means all the source code for all modules it contains, plus any associated interface definition files, plus the scripts used to control compilation and installation of the executable. However, as a special exception, the source code distributed need not include anything that is normally distributed (in either source or binary form) with the major components (compiler, kernel, and so on) of the operating system on which the executable runs, unless that component itself accompanies the executable.
If distribution of executable or object code is made by offering access to copy from a designated place, then offering equivalent access to copy the source code from the same place counts as distribution of the source code, even though third parties are not compelled to copy the source along with the object code.
If any portion of this section is held invalid or unenforceable under any particular circumstance, the balance of the section is intended to apply and the section as a whole is intended to apply in other circumstances.
It is not the purpose of this section to induce you to infringe any patents or other property right claims or to contest validity of any such claims; this section has the sole purpose of protecting the integrity of the free software distribution system, which is implemented by public license practices. Many people have made generous contributions to the wide range of software distributed through that system in reliance on consistent application of that system; it is up to the author/donor to decide if he or she is willing to distribute software through any other system and a licensee cannot impose that choice.
This section is intended to make thoroughly clear what is believed to be a consequence of the rest of this License.
Each version is given a distinguishing version number. If the Program specifies a version number of this License which applies to it and “any later version”, you have the option of following the terms and conditions either of that version or of any later version published by the Free Software Foundation. If the Program does not specify a version number of this License, you may choose any version ever published by the Free Software Foundation.
If you develop a new program, and you want it to be of the greatest possible use to the public, the best way to achieve this is to make it free software which everyone can redistribute and change under these terms.
To do so, attach the following notices to the program. It is safest to attach them to the start of each source file to most effectively convey the exclusion of warranty; and each file should have at least the “copyright” line and a pointer to where the full notice is found.
     one line to give the program's name and an idea of what it does.
     Copyright (C) 19yy  name of author

     This program is free software; you can redistribute it and/or
     modify it under the terms of the GNU General Public License
     as published by the Free Software Foundation; either version 2
     of the License, or (at your option) any later version.

     This program is distributed in the hope that it will be useful,
     but WITHOUT ANY WARRANTY; without even the implied warranty of
     MERCHANTABILITY or FITNESS FOR A PARTICULAR PURPOSE.  See the
     GNU General Public License for more details.

     You should have received a copy of the GNU General Public License
     along with this program; if not, write to the Free Software
     Foundation, Inc., 675 Mass Ave, Cambridge, MA 02139, USA.
Also add information on how to contact you by electronic and paper mail.
If the program is interactive, make it output a short notice like this when it starts in an interactive mode:
     Gnomovision version 69, Copyright (C) 19yy name of author
     Gnomovision comes with ABSOLUTELY NO WARRANTY; for details
     type `show w'.  This is free software, and you are welcome
     to redistribute it under certain conditions; type `show c'
     for details.
The hypothetical commands `show w' and `show c' should show the appropriate parts of the General Public License. Of course, the commands you use may be called something other than `show w' and `show c'; they could even be mouse-clicks or menu items—whatever suits your program.
You should also get your employer (if you work as a programmer) or your school, if any, to sign a “copyright disclaimer” for the program, if necessary. Here is a sample; alter the names:
     Yoyodyne, Inc., hereby disclaims all copyright
     interest in the program `Gnomovision'
     (which makes passes at compilers) written
     by James Hacker.

     signature of Ty Coon, 1 April 1989
     Ty Coon, President of Vice
This General Public License does not permit incorporating your program into proprietary programs. If your program is a subroutine library, you may consider it more useful to permit linking proprietary applications with the library. If this is what you want to do, use the GNU Library General Public License instead of this License.
     Copyright © 2000,2001,2002 Free Software Foundation, Inc.
     51 Franklin St, Fifth Floor, Boston, MA  02110-1301, USA

     Everyone is permitted to copy and distribute verbatim copies
     of this license document, but changing it is not allowed.
The purpose of this License is to make a manual, textbook, or other functional and useful document free in the sense of freedom: to assure everyone the effective freedom to copy and redistribute it, with or without modifying it, either commercially or noncommercially. Secondarily, this License preserves for the author and publisher a way to get credit for their work, while not being considered responsible for modifications made by others.
This License is a kind of “copyleft”, which means that derivative works of the document must themselves be free in the same sense. It complements the GNU General Public License, which is a copyleft license designed for free software.
We have designed this License in order to use it for manuals for free software, because free software needs free documentation: a free program should come with manuals providing the same freedoms that the software does. But this License is not limited to software manuals; it can be used for any textual work, regardless of subject matter or whether it is published as a printed book. We recommend this License principally for works whose purpose is instruction or reference.
This License applies to any manual or other work, in any medium, that contains a notice placed by the copyright holder saying it can be distributed under the terms of this License. Such a notice grants a world-wide, royalty-free license, unlimited in duration, to use that work under the conditions stated herein. The “Document”, below, refers to any such manual or work. Any member of the public is a licensee, and is addressed as “you”. You accept the license if you copy, modify or distribute the work in a way requiring permission under copyright law.
A “Modified Version” of the Document means any work containing the Document or a portion of it, either copied verbatim, or with modifications and/or translated into another language.
A “Secondary Section” is a named appendix or a front-matter section of the Document that deals exclusively with the relationship of the publishers or authors of the Document to the Document's overall subject (or to related matters) and contains nothing that could fall directly within that overall subject. (Thus, if the Document is in part a textbook of mathematics, a Secondary Section may not explain any mathematics.) The relationship could be a matter of historical connection with the subject or with related matters, or of legal, commercial, philosophical, ethical or political position regarding them.
The “Invariant Sections” are certain Secondary Sections whose titles are designated, as being those of Invariant Sections, in the notice that says that the Document is released under this License. If a section does not fit the above definition of Secondary then it is not allowed to be designated as Invariant. The Document may contain zero Invariant Sections. If the Document does not identify any Invariant Sections then there are none.
The “Cover Texts” are certain short passages of text that are listed, as Front-Cover Texts or Back-Cover Texts, in the notice that says that the Document is released under this License. A Front-Cover Text may be at most 5 words, and a Back-Cover Text may be at most 25 words.
A “Transparent” copy of the Document means a machine-readable copy, represented in a format whose specification is available to the general public, that is suitable for revising the document straightforwardly with generic text editors or (for images composed of pixels) generic paint programs or (for drawings) some widely available drawing editor, and that is suitable for input to text formatters or for automatic translation to a variety of formats suitable for input to text formatters. A copy made in an otherwise Transparent file format whose markup, or absence of markup, has been arranged to thwart or discourage subsequent modification by readers is not Transparent. An image format is not Transparent if used for any substantial amount of text. A copy that is not “Transparent” is called “Opaque”.
Examples of suitable formats for Transparent copies include plain ascii without markup, Texinfo input format, LaTeX input format, SGML or XML using a publicly available DTD, and standard-conforming simple HTML, PostScript or PDF designed for human modification. Examples of transparent image formats include PNG, XCF and JPG. Opaque formats include proprietary formats that can be read and edited only by proprietary word processors, SGML or XML for which the DTD and/or processing tools are not generally available, and the machine-generated HTML, PostScript or PDF produced by some word processors for output purposes only.
The “Title Page” means, for a printed book, the title page itself, plus such following pages as are needed to hold, legibly, the material this License requires to appear in the title page. For works in formats which do not have any title page as such, “Title Page” means the text near the most prominent appearance of the work's title, preceding the beginning of the body of the text.
A section “Entitled XYZ” means a named subunit of the Document whose title either is precisely XYZ or contains XYZ in parentheses following text that translates XYZ in another language. (Here XYZ stands for a specific section name mentioned below, such as “Acknowledgements”, “Dedications”, “Endorsements”, or “History”.) To “Preserve the Title” of such a section when you modify the Document means that it remains a section “Entitled XYZ” according to this definition.
The Document may include Warranty Disclaimers next to the notice which states that this License applies to the Document. These Warranty Disclaimers are considered to be included by reference in this License, but only as regards disclaiming warranties: any other implication that these Warranty Disclaimers may have is void and has no effect on the meaning of this License.
You may copy and distribute the Document in any medium, either commercially or noncommercially, provided that this License, the copyright notices, and the license notice saying this License applies to the Document are reproduced in all copies, and that you add no other conditions whatsoever to those of this License. You may not use technical measures to obstruct or control the reading or further copying of the copies you make or distribute. However, you may accept compensation in exchange for copies. If you distribute a large enough number of copies you must also follow the conditions in section 3.
You may also lend copies, under the same conditions stated above, and you may publicly display copies.
If you publish printed copies (or copies in media that commonly have printed covers) of the Document, numbering more than 100, and the Document's license notice requires Cover Texts, you must enclose the copies in covers that carry, clearly and legibly, all these Cover Texts: Front-Cover Texts on the front cover, and Back-Cover Texts on the back cover. Both covers must also clearly and legibly identify you as the publisher of these copies. The front cover must present the full title with all words of the title equally prominent and visible. You may add other material on the covers in addition. Copying with changes limited to the covers, as long as they preserve the title of the Document and satisfy these conditions, can be treated as verbatim copying in other respects.
If the required texts for either cover are too voluminous to fit legibly, you should put the first ones listed (as many as fit reasonably) on the actual cover, and continue the rest onto adjacent pages.
If you publish or distribute Opaque copies of the Document numbering more than 100, you must either include a machine-readable Transparent copy along with each Opaque copy, or state in or with each Opaque copy a computer-network location from which the general network-using public has access to download using public-standard network protocols a complete Transparent copy of the Document, free of added material. If you use the latter option, you must take reasonably prudent steps, when you begin distribution of Opaque copies in quantity, to ensure that this Transparent copy will remain thus accessible at the stated location until at least one year after the last time you distribute an Opaque copy (directly or through your agents or retailers) of that edition to the public.
It is requested, but not required, that you contact the authors of the Document well before redistributing any large number of copies, to give them a chance to provide you with an updated version of the Document.
You may copy and distribute a Modified Version of the Document under the conditions of sections 2 and 3 above, provided that you release the Modified Version under precisely this License, with the Modified Version filling the role of the Document, thus licensing distribution and modification of the Modified Version to whoever possesses a copy of it. In addition, you must do these things in the Modified Version:
If the Modified Version includes new front-matter sections or appendices that qualify as Secondary Sections and contain no material copied from the Document, you may at your option designate some or all of these sections as invariant. To do this, add their titles to the list of Invariant Sections in the Modified Version's license notice. These titles must be distinct from any other section titles.
You may add a section Entitled “Endorsements”, provided it contains nothing but endorsements of your Modified Version by various parties—for example, statements of peer review or that the text has been approved by an organization as the authoritative definition of a standard.
You may add a passage of up to five words as a Front-Cover Text, and a passage of up to 25 words as a Back-Cover Text, to the end of the list of Cover Texts in the Modified Version. Only one passage of Front-Cover Text and one of Back-Cover Text may be added by (or through arrangements made by) any one entity. If the Document already includes a cover text for the same cover, previously added by you or by arrangement made by the same entity you are acting on behalf of, you may not add another; but you may replace the old one, on explicit permission from the previous publisher that added the old one.
The author(s) and publisher(s) of the Document do not by this License give permission to use their names for publicity for or to assert or imply endorsement of any Modified Version.
You may combine the Document with other documents released under this License, under the terms defined in section 4 above for modified versions, provided that you include in the combination all of the Invariant Sections of all of the original documents, unmodified, and list them all as Invariant Sections of your combined work in its license notice, and that you preserve all their Warranty Disclaimers.
The combined work need only contain one copy of this License, and multiple identical Invariant Sections may be replaced with a single copy. If there are multiple Invariant Sections with the same name but different contents, make the title of each such section unique by adding at the end of it, in parentheses, the name of the original author or publisher of that section if known, or else a unique number. Make the same adjustment to the section titles in the list of Invariant Sections in the license notice of the combined work.
In the combination, you must combine any sections Entitled “History” in the various original documents, forming one section Entitled “History”; likewise combine any sections Entitled “Acknowledgements”, and any sections Entitled “Dedications”. You must delete all sections Entitled “Endorsements.”
You may make a collection consisting of the Document and other documents released under this License, and replace the individual copies of this License in the various documents with a single copy that is included in the collection, provided that you follow the rules of this License for verbatim copying of each of the documents in all other respects.
You may extract a single document from such a collection, and distribute it individually under this License, provided you insert a copy of this License into the extracted document, and follow this License in all other respects regarding verbatim copying of that document.
A compilation of the Document or its derivatives with other separate and independent documents or works, in or on a volume of a storage or distribution medium, is called an “aggregate” if the copyright resulting from the compilation is not used to limit the legal rights of the compilation's users beyond what the individual works permit. When the Document is included in an aggregate, this License does not apply to the other works in the aggregate which are not themselves derivative works of the Document.
If the Cover Text requirement of section 3 is applicable to these copies of the Document, then if the Document is less than one half of the entire aggregate, the Document's Cover Texts may be placed on covers that bracket the Document within the aggregate, or the electronic equivalent of covers if the Document is in electronic form. Otherwise they must appear on printed covers that bracket the whole aggregate.
Translation is considered a kind of modification, so you may distribute translations of the Document under the terms of section 4. Replacing Invariant Sections with translations requires special permission from their copyright holders, but you may include translations of some or all Invariant Sections in addition to the original versions of these Invariant Sections. You may include a translation of this License, and all the license notices in the Document, and any Warranty Disclaimers, provided that you also include the original English version of this License and the original versions of those notices and disclaimers. In case of a disagreement between the translation and the original version of this License or a notice or disclaimer, the original version will prevail.
If a section in the Document is Entitled “Acknowledgements”, “Dedications”, or “History”, the requirement (section 4) to Preserve its Title (section 1) will typically require changing the actual title.
You may not copy, modify, sublicense, or distribute the Document except as expressly provided for under this License. Any other attempt to copy, modify, sublicense or distribute the Document is void, and will automatically terminate your rights under this License. However, parties who have received copies, or rights, from you under this License will not have their licenses terminated so long as such parties remain in full compliance.
The Free Software Foundation may publish new, revised versions of the GNU Free Documentation License from time to time. Such new versions will be similar in spirit to the present version, but may differ in detail to address new problems or concerns. See http://www.gnu.org/copyleft/.
Each version of the License is given a distinguishing version number. If the Document specifies that a particular numbered version of this License “or any later version” applies to it, you have the option of following the terms and conditions either of that specified version or of any later version that has been published (not as a draft) by the Free Software Foundation. If the Document does not specify a version number of this License, you may choose any version ever published (not as a draft) by the Free Software Foundation.
To use this License in a document you have written, include a copy of the License in the document and put the following copyright and license notices just after the title page:
       Copyright (C)  year  your name.
       Permission is granted to copy, distribute and/or modify this document
       under the terms of the GNU Free Documentation License, Version 1.2
       or any later version published by the Free Software Foundation;
       with no Invariant Sections, no Front-Cover Texts, and no Back-Cover
       Texts.  A copy of the license is included in the section entitled ``GNU
       Free Documentation License''.
If you have Invariant Sections, Front-Cover Texts and Back-Cover Texts, replace the “with...Texts.” line with this:
         with the Invariant Sections being list their titles, with
         the Front-Cover Texts being list, and with the Back-Cover Texts
         being list.
If you have Invariant Sections without Cover Texts, or some other combination of the three, merge those two alternatives to suit the situation.
If your document contains nontrivial examples of program code, we recommend releasing these examples in parallel under your choice of free software license, such as the GNU General Public License, to permit their use in free software.
gmixvm: gmixvmhelp: Interactive modeload: Interactive modemixasm: mixasmmixasm: Compilingmixguile: mixguilemixguile: The mixguile shellmixguile options: Invoking mixguilemixvm: Running the programnext: Debuggingpc: Interactive modepmem: Interactive modepreg: Interactive modepsym: Debuggingrun: Interactive modesbp: Debuggingsbpa: Debuggingscmf: Using Scheme in mixvm and gmixvmun: MIX architectureAbout...: Menu and status barsADD: Arithmetic operatorsALF: MIXAL directivescabp: Debug commandscbp: Debug commandscbpa: Debug commandscbpc: Debug commandscbpm: Debug commandscbpo: Debug commandscbpr: Debug commandsChange font: Menu and status barsCHAR: Conversion operatorsClear breakpoints: Menu and status barsCMPA: Comparison operatorsCMPi: Comparison operatorsCMPX: Comparison operatorscompile: File commandsCompile...: Menu and status barsCON: MIXAL directivesDECA: Address transfer operatorsDECi: Address transfer operatorsDECX: Address transfer operatorsDetached windows: Menu and status barsDevices dir...: Menu and status barsDevice output...: Menu and status barsDIV: Arithmetic operatorsedit: File commandsEdit...: Menu and status barsEND: MIXAL directivesENNA: Address transfer operatorsENNi: Address transfer operatorsENNX: Address transfer operatorsENTA: Address transfer operatorsENTi: Address transfer operatorsENTX: Address transfer operatorsEQU: MIXAL directivesExit: Menu and status barsExternal programs...: Menu and status barshelp: CommandsHLT: Miscellaneous operatorsIN: Input-output operatorsINCA: Address transfer operatorsINCi: Address transfer operatorsINCX: Address transfer operatorsIOC: Input-output operatorsJAN: Jump operatorsJANN: Jump operatorsJANP: Jump operatorsJANZ: Jump operatorsJAP: Jump operatorsJAZ: Jump operatorsJBUS: Input-output operatorsJE: Jump operatorsJG: Jump operatorsJGE: Jump operatorsJiN: Jump operatorsJiNN: Jump operatorsJiNP: Jump operatorsJiNZ: Jump operatorsJiP: Jump operatorsJiZ: Jump operatorsJL: Jump operatorsJLE: Jump operatorsJMP: Jump operatorsJNE: Jump operatorsJNOV: Jump operatorsJOV: Jump operatorsJRED: Input-output operatorsJSJ: Jump operatorsJXN: Jump operatorsJXNN: Jump operatorsJXNP: Jump operatorsJXNZ: Jump operatorsJXP: Jump operatorsJXZ: Jump operatorsLDA: Loading operatorsLDAN: Loading operatorsLDi: Loading operatorsLDiN: Loading operatorsLDX: Loading operatorsLDXN: Loading operatorsload: File commandsLoad...: Menu and status barsmix-add-break-hook: Hooksmix-add-cond-break: Hooksmix-add-global-post-hook: Hooksmix-add-global-pre-hook: Hooksmix-add-post-hook: Hooksmix-add-pre-hook: Hooksmix-cell: Additional VM functionsmix-cmp: Additional VM functionsmix-ddir: Additional VM functionsmix-lap-time: Additional VM functionsmix-last-result: mixvm wrappersmix-loc: Additional VM functionsmix-over: Additional VM functionsmix-pmem: mixvm wrappersmix-preg: mixvm wrappersmix-prog-name: Additional VM functionsmix-prog-path: Additional VM functionsmix-prog-time: Additional VM functionsmix-reg: Additional VM functionsmix-set-cell!: Additional VM functionsmix-set-cmp!: Additional VM functionsmix-set-over!: Additional VM functionsmix-set-reg!: Additional VM functionsmix-sover: mixvm wrappersmix-src-line: Additional VM functionsmix-src-line-no: Additional VM functionsmix-src-path: Additional VM functionsmix-sreg: mixvm wrappersmix-up-time: Additional VM functionsmix-vm-break?: Additional VM functionsmix-vm-cond-break?: Additional VM functionsmix-vm-empty?: Additional VM functionsmix-vm-error?: Additional VM functionsmix-vm-halted?: Additional VM functionsmix-vm-loaded?: Additional VM functionsmix-vm-running?: Additional VM functionsmix-vm-status: Additional VM functionsmixvm-cmd: mixvm wrappersmixvm-status: Additional VM functionsMOVE: Miscellaneous operatorsMUL: Arithmetic operatorsNext: Menu and status barsnext: Debug commandsNOP: Miscellaneous operatorsNUM: Conversion operatorsORIG: MIXAL directivesOUT: Input-output operatorspall: State commandspasm: Configuration commandspbt: Debug commandspc: State commandspddir: Configuration commandspedit: Configuration commandspflags: State commandspline: Debug commandspmem: State commandspprog: File commandspreg: State commandsprompt: Configuration commandspsrc: File commandspstat: State commandspsym: Debug commandsptime: Configuration commandsquit: File commandsRun: Menu and status barsrun: File commandssasm: Configuration commandsSave: Menu and status barsSave on exit: Menu and status barssbp: Debug commandssbpc: Debug commandssbpm: Debug commandssbpo: Debug commandssbpr: Debug commandsscmf: Scheme commandsscmp: State commandssddir: Configuration commandssedit: Configuration commandsSLA: Shift operatorsSLAX: Shift operatorsSLC: Shift operatorsslog: Configuration commandssmem: State commandssover: State commandsspba: Debug commandsSRA: Shift operatorsSRAX: Shift operatorsSRC: Shift operatorssreg: State commandsssym: Debug commandsSTA: Storing operatorsSTi: Storing operatorsstime: Configuration commandsSTJ: Storing operatorsstrace: Debug commandsSTX: Storing operatorsSTZ: Storing operatorsSUB: Arithmetic operatorsSymbols...: Menu and status barsToolbar(s): Menu and status barsw2d: Debug commandsweval: Debug commands[1] See mdk's Arch page for more information on using the unstable source tree. Note, however, that the rest of this manual is about the stable release.
[2] Caveats: Christoph has only tested mixvm and
mixasm on this platform, using gcc 2.95.3-2, GLIB
1.2.10 and GNUreadline 4.1-2. He has reported missing history
functionalities on a first try. If you find problems with
history/readline functionality, please try a newer/manually installed
readline version.
[3] The actual memory address the instruction refers to, is obtained by adding to ADDRESS the value of the `rI' register denoted by INDEX.
[4] In general, `[X]' will denote the contents of entity `X'; thus, by definition, `V = [M](MOD)'.
[5] In Knuth's original definition, there are other control operations available, but they do not make sense when implementing the block devices as disk files (as we do in mdk simulator). For the same reason, mdk devices are always ready, since all input-output operations are performed using synchronous system calls.
[6] We shall call them, collectively, MIXAL instructions.
[7] In fact, Knuth's definition of MIXAL restricts the
column number at which each of these instruction parts must start. The
MIXAL assembler included in mdk, mixasm, does not impose
such restriction.
[8] In the original
MIXAL definition, the ALF argument is not quoted. You can write
the operand (as the ADDRESS field) without quotes, but, in this
case, you must follow the alignment rules of the original MIXAL
definition (namely, the ADDRESS must start at column 17).
[9] The author wants to thank Philip E. King for pointing these two special cases of local symbol usage to him.
[10] If an ORIG directive is not used, the program will
be loaded by the virtual machine at address 0. ORIG allows
allocating the executable code where you see fit.
[11] In Knuth's definition,
the operand always starts at a fixed column number, and the use of
quotation is therefore unnecessary. As mixasm releases this
requirement, marking the beginning and end of the ALF operand
disambiguates the parser's recognition of this operand when it includes
blanks. Note that double-quotes (") are not part of the MIX character
set, and, therefore, no escape characters are needed within
ALF's operands.
[12] The device files are stored, by
default, in a directory called .mdk, which is created in your
home directory the first time mixvm is run. You can change this
default directory using the command devdir when running
mixvm in interactive mode (see Configuration commands)
[13] The mixguile program allows you to execute
arbitrary combinations of mixvm commands (using Scheme)
non-interactively. See Scheme scripts.
[14] Printing of timing statistics can be disabled using
the command timing (see Configuration commands).
[15] You may have
noticed that break hooks can be implemented in terms of command hooks
associated to mix-run and mix-next. As a matter of fact,
they are implemented this way: take a look at the file
install_dir/share/mdk/mix-vm-stat.scm if you are curious.
[16] mixal-mode has been developed and documented by Pieter E. J. Pareit
[17] mixvm.el has been kindly contributed by Philip E. King. mixvm.el is based on a study of gdb, perldb, and pdb as found in gud.el, and rubydb3x.el distributed with the source code to the Ruby language.
[18] The default command prompt, `MIX > ', can be
changed using the prompt command (see Configuration commands)
[19] The readline functionality will be available if you have compiled mdk with readline support, i.e., if GNU readline is installed in your system. This is ofte the case in GNU/Linux and BSD systems