This manual describes version 0.1.0 of gschedwi.
Copyright © 2007 Herve Quatremain
Permission is granted to copy, distribute and/or modify this document under the terms of the GNU Free Documentation License (GFDL), Version 1.1 or any later version published by the Free Software Foundation with no Invariant Sections, no Front-Cover Texts, and no Back-Cover Texts. You can find a copy of the GFDL at this link or in the file COPYING-DOCS distributed with this manual.
This manual is part of a collection of GNOME manuals distributed under the GFDL. If you want to distribute this manual separately from the collection, you can do so by adding a copy of the license to the manual, as described in section 6 of the license.
Many of the names used by companies to distinguish their products and services are claimed as trademarks. Where those names appear in any GNOME documentation, and the members of the GNOME Documentation Project are made aware of those trademarks, then the names are in capital letters or initial capital letters.
DOCUMENT AND MODIFIED VERSIONS OF THE DOCUMENT ARE PROVIDED UNDER THE TERMS OF THE GNU FREE DOCUMENTATION LICENSE WITH THE FURTHER UNDERSTANDING THAT:
DOCUMENT IS PROVIDED ON AN "AS IS" BASIS, WITHOUT WARRANTY OF ANY KIND, EITHER EXPRESSED OR IMPLIED, INCLUDING, WITHOUT LIMITATION, WARRANTIES THAT THE DOCUMENT OR MODIFIED VERSION OF THE DOCUMENT IS FREE OF DEFECTS MERCHANTABLE, FIT FOR A PARTICULAR PURPOSE OR NON-INFRINGING. THE ENTIRE RISK AS TO THE QUALITY, ACCURACY, AND PERFORMANCE OF THE DOCUMENT OR MODIFIED VERSION OF THE DOCUMENT IS WITH YOU. SHOULD ANY DOCUMENT OR MODIFIED VERSION PROVE DEFECTIVE IN ANY RESPECT, YOU (NOT THE INITIAL WRITER, AUTHOR OR ANY CONTRIBUTOR) ASSUME THE COST OF ANY NECESSARY SERVICING, REPAIR OR CORRECTION. THIS DISCLAIMER OF WARRANTY CONSTITUTES AN ESSENTIAL PART OF THIS LICENSE. NO USE OF ANY DOCUMENT OR MODIFIED VERSION OF THE DOCUMENT IS AUTHORIZED HEREUNDER EXCEPT UNDER THIS DISCLAIMER; AND
UNDER NO CIRCUMSTANCES AND UNDER NO LEGAL THEORY, WHETHER IN TORT (INCLUDING NEGLIGENCE), CONTRACT, OR OTHERWISE, SHALL THE AUTHOR, INITIAL WRITER, ANY CONTRIBUTOR, OR ANY DISTRIBUTOR OF THE DOCUMENT OR MODIFIED VERSION OF THE DOCUMENT, OR ANY SUPPLIER OF ANY OF SUCH PARTIES, BE LIABLE TO ANY PERSON FOR ANY DIRECT, INDIRECT, SPECIAL, INCIDENTAL, OR CONSEQUENTIAL DAMAGES OF ANY CHARACTER INCLUDING, WITHOUT LIMITATION, DAMAGES FOR LOSS OF GOODWILL, WORK STOPPAGE, COMPUTER FAILURE OR MALFUNCTION, OR ANY AND ALL OTHER DAMAGES OR LOSSES ARISING OUT OF OR RELATING TO USE OF THE DOCUMENT AND MODIFIED VERSIONS OF THE DOCUMENT, EVEN IF SUCH PARTY SHALL HAVE BEEN INFORMED OF THE POSSIBILITY OF SUCH DAMAGES.
Feedback
To report a bug or make a suggestion regarding the gschedwi application or this manual, follow the directions in the gschedwi Help Page.
| Revision History | |
|---|---|
| Revision gschedwi Manual V0.1.0 | January 2007 |
|
GNOME Documentation Project | |
Table of Contents
Schedwi is a task scheduler. It can run scripts or commands on remote clients at a specified date and time and its chaining capability allows tasks to be run in sequence. gschedwi is composed of the following components:
The server schedules the tasks and submits them to the clients. The execution of a task can be triggered by date and time but also by the result of a previous task or by the existence of a file on a remote client (useful when a task must process a file generated by a previous task).
The clients (or agents) receive the task requests from the server and run them on the local host. They report the execution status to the server.
An interface allows the administrators to follow the task scheduling in real time. An other one is used to define new tasks.
This documentation is about these two interfaces:
- gschedwi
This program is used to configure the Schedwy system and to define new jobs and jobsets. It is aimed at the adminstrators.
- gschedwicons
This program is used to follow the task scheduling. It is aimed at the operators.
Both are using the GNOME Desktop Environment.
A job defines all the parameters required for a command to be run on a remote host. For instance, the start time, the remote host name and the command path are such parameters. See the section called “Jobs and jobsets parameters” for a complete list.
A jobset is a group of jobs and jobsets. Jobsets can be used to organize the jobs. For instance, you can create a jobset for the production environment, and an other one for the test environment. In these jobsets you can then organized the jobs depending of their function. A jobset can also contain other jobsets. In the previous example, you could for instance create a jobset under the production environment for each corporate office around the country.
All the job parameters are also available at the jobset level and provide default values for the jobs inside the jobset. Jobs can then be easily defined; only a few parameters have to be entered, the other ones will be using the default values defined at the jobset level. Parameters not defined by the jobset are recursively retrieved from the parent's jobset and up to the Root jobset which provides default values for all the parameters.
This mechanism can also be used to quickly change the value of a parameter for a group of jobs. For instance, if you change the start time at the jobset level, all the jobs and jobsets inside it will then start at this new time. However, if the parameter has been explicitly set in a job, it will not be overwritten by the parameter of the jobset.
Each job and jobset has an associated status. These status are represented in the following schema. The links represent the transition from a state to an other.
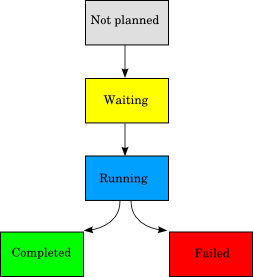
- Waiting
The job is planned to run but its start time or other constraints are not yet satisfied.
- Running
For a job it means that the associated command is running. For a jobset, it means that all its constraints are satisfied (start time, links, ...) Its jobs can the be started.
- Completed
The job is successfully completed. For a jobset, all its jobs are completed.
- Failed
The associated job command has failed. For a jobset it means that at least one job has failed.
The start of jobs and jobsets is controlled by several mechanisms which are defined in the following paragraphs.
- Date
One of the job and jobset parameter is the calendar name. This parameter specifies on which days the job or jobset must be run. See the section called “Calendars” for more details.
- Time
This parameter specifies the start time of the job or jobset.
- Links
Links can be used to chain the execution of jobs and jobsets. A job will not start until all its links are satisfied. Four types of links exist and they specify at which state the linked job must be for the current job to start. For instance the Complete link specifies that the linked job must be completed for the current job to start.
- Files
The start of a job can be triggered by the presence (of absence) of one ore more files on remote host.
To start gschedwi from the command line, type the following command, then press Return :
gschedwi
To start gschedwicons from the command line, type the following command, then press Return :
gschedwicons
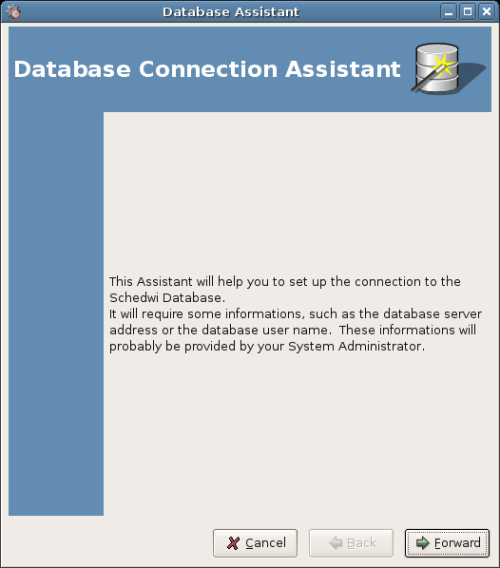
When you start gschedwi or gschedwicons for the first time, the database druid is displayed. It will guide you through the steps to configure the access to the Schedwi database.
When you start gschedwi, once the database access has been configured and is working, you are asked for your login and the associated password in order to be granted the access to the interface.
![[Note]](images/note.png) | |
Make sure that your caps lock is off to enter your password. |
The login and password must have been defined in the MySQL database. If you cannot access the Schedwi database you should check the status of the MySQL database and alternatively you can run the Database Assistant again ( ->).
The main window is then displayed.
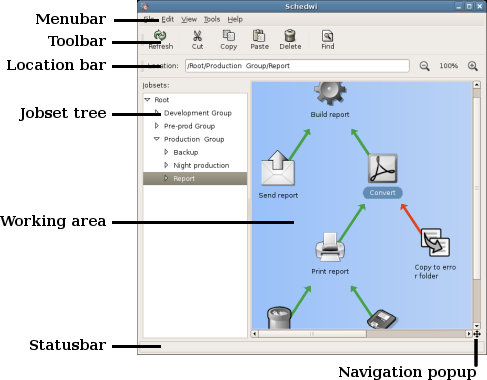
The menubar contains all the commands available.
- Login
Use this menu item to login to the Schedwi database.
- Logout
Use this menu item to logout from the Schedwi database.
- Quit
Quit gschedwi.
- Cut
Cut the selected job or jobset from the working area. The item is moved in the clipboard and can then be paste back to the working area.
- Copy
Copy the selected job or jobset in the clipboard. It may then be paste to the working area.
- Paste
Paste the item in the clipboard back to the working area. If the item in the clipboard is a jobset, all its job and jobset children are recursively pasted.
- Delete
Delete the selected job, jobset or link. In case of a jobset, all its job and jobset children are also deleted.
![[Warning]](images/warning.png)
Warning. Once an item has been deleted, it is definitively destroyed and cannot be retrieved.
- Find
Show the Find popup to search for a job or jobset. See the section called “Find”.
- Default Job Parameters
Edit the Root jobset parameters. The Root jobset defines the default parameters for all the jobs and jobsets in the database.
- Database Assistant
Start the Database Assistant to configure the parameters required to access the Schedwi database.
- Preferences
Show the Preferences window to customize the interface. See the section called “Preferences” for more details.
- Refresh
Refresh the current view.
- Location bar
Show and hide the location bar.
- Status bar
Show and hide the status bar.
- Zoom in
Zoom in the working area to show it in more details.
- Zoom out
Zoom out of the working area to show it in less details.
- Normal size
Reset the zoom to show the working area in normal size.
- Show grid
Show and hide he working area grid. You can customize this grid through the Preferences window (see the section called “Grid tab”).
- Snap to grid
Snap the object to the grid. You can use the option to align the jobs and jobsets in the working area.
- Hosts
Display the host list. You can use this window to manage the remote Schedwi agent. See the section called “Remote Agents”.
- Environments
Display the environment list to manage the groups of environment variables. See the section called “Environment variables”.
- Calendars
Display the calendar list. See the section called “Calendars”.
The location bar contains the path to the currently displayed jobset. Like the path of a file on the disk, jobsets are separated by a '/' character. You can also enter a path in the location entry and press Return to display the associated jobset. The location bar also contains two buttons to zoom in and out the working area.
You can hide and display the bar by the -> menu item.
The jobset tree is a tree view of the jobsets. You can use this view to navigate through jobset tree. When you select a jobset in the tree, its content is displayed in the working area on the right.
Each jobset can be expanded to view its children jobsets by clicking on the arrow on the left of the jobset name.
The working area is the main part of the interface. It is used to display the jobs and jobsets, and the links between them. Through this interface, you can:
Create a new job or jobset by right clicking on the working area and by choosing or .
Copy, cut and paste jobs and jobsets.
Delete jobs, jobsets and links.
Edit jobs and jobsets by double-clicking on them or by right-clicking on the job or jobset you want to edit and by choosing .
Create new links by right-clicking on the source job or jobset and by choosing .
Change a link type by right-clicking on it and choosing .
Display job and jobset running statistics by right-clicking on the job or jobset and by choosing .
Change the working area size and background by right-clicking on the background and by choosing .
You can also zoom in and out to display the working area in more details by using the and button in the location bar or the corresponding menu items in the menu.
The navigation popup, at the bottom right of the working area, between the scrollbars, can be use to adjust the viewport of the working area. Click on the navigation icon and drag the mouse to adjust the view.
When you start gschedwicons, once the database access has been configured and is working, you are asked for your login and the associated password in order to be granted the access to the interface.
| |
Make sure that your caps lock is off to enter your password. |
The login and password must have been defined in the MySQL database. If you cannot access the Schedwi database you should check the status of the MySQL database and alternatively you can run the Database Assistant again ( ->).
The main window is then displayed.
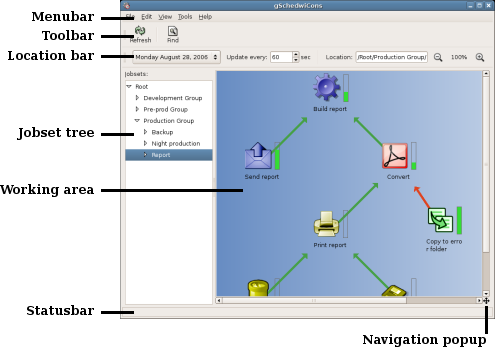
The menubar contains all the commands available.
- Login
Use this menu item to login to the Schedwi database.
- Logout
Use this menu item to logout from the Schedwi database.
- Quit
Quit gschedwi.
- Find
Show the Find popup to search for a job or jobset. See the section called “Find”.
- View Default Job Parameters
View the Root jobset parameters. The Root jobset defines the default parameters for all the jobs and jobsets in the database.
- Database Assistant
Start the Database Assistant to configure the parameters required to access the Schedwi database.
- Preferences
Show the Preferences window to customize the interface. See the section called “Preferences” for more details.
- Refresh
Refresh the current view.
- Location bar
Show and hide the location bar.
- Status bar
Show and hide the status bar.
- Zoom in
Zoom in the working area to show it in more details.
- Zoom out
Zoom out of the working area to show it in less details.
- Normal size
Reset the zoom to show the working area in normal size.
- View Hosts
Display the host list. See the section called “Remote Agents”.
- View Environments
Display the environment list to manage the groups of environment variables. See the section called “Environment variables”.
- View Calendars
Display the calendar list. See the section called “Calendars”.
The location bar contains several controls:
The currently displayed running date.
The interface refresh frequency.
The path to the currently displayed jobset. Like the path of a file on the disk, jobsets are separated by a '/' character. You can also enter a path in the location entry and press Return to display the associated jobset.
Two buttons to zoom in and out the working area.
You can hide and display the bar by the -> menu item.
The jobset tree is a tree view of the jobsets. You can use this view to navigate through jobset tree. When you select a jobset in the tree, its content is displayed in the working area on the right.
Each jobset can be expanded to view its children jobsets by clicking on the arrow on the left of the jobset name.
The working area is the main part of the interface. It is used to display the jobs and jobsets, and the links between them. Through this interface, you can:
View the current status of the jobs and jobsets. You can also get more details by just moving the mouse over their icons.
The gauge near the icon specifies, when the job or jobset is running, the execution time and the expected duration (based on the previous executions).
View the details of a job or a jobset by right-clicking on it and by choosing . You can also directly double-click on it.
Change the current status of a job or jobset by right-clicking on it and choosing a new status.
Display job and jobset running statistics by right-clicking on the job or jobset and by choosing .
You can also zoom in and out to display the working area in more details by using the and button in the location bar or the corresponding menu items in the menu.
The navigation popup, at the bottom right of the working area, between the scrollbars, can be use to adjust the viewport of the working area. Click on the navigation icon and drag the mouse to adjust the view.
From this window you can define the job or jobset parameters. As jobs and jobsets
are organized in a hierarchy, the default parameters for a job are the ones defined by its
parent jobset (and recursively up to the Root jobset). For example, the default value for
the Start Time parameter for a job is the value of its
parent jobset. If this jobset does not define the Start Time
parameter, the default value will be the value of the parent jobset and so on up to the
Root jobset.
Some of the parameters are only relevant for jobs. For instance the
Command parameter, which defines the command to run
on the remote agent, is only relevant for jobs. However, you can define this parameter at
the jobset level; its value will be used as the default value for all its children.
From the job/jobset details window, you can directly enter a value for a parameter or choose to use its default value by clicking on the button at the right of the field.
The parameters of the Root jobset are set at install time and they will be used as default for all the jobs and jobsets. You can update them under ->.
This tab defines the main parameters of a job or a jobset.
- Enabled
Specifies if this job or jobset must be taken into account by the Schedwi server engine. If this button is not checked then the job will be ignored by the engine. For a jobset, all its children will be ignored too, even if they are enabled. This mechanism may be useful to prepare a job or a complete jobset hierarchy in advance and to enable it at a specific date.
- Name
Name of the job or jobset.
- Hostname
This is the remote agent host name for this job. The remote agent must have been defined first through the ->window. For a jobset, this host name will be used as a default for its children.
- Calendar
This parameter defines the date at which the job or jobset must run. The calendar must have been defined first through the ->window.
- Start time
This defines the start hour and minute of the job or jobset.
- Start limit
This parameter is the number of minutes for the job or jobset to start after its start time. Past this limit, the job or jobset will be failed. The start delay may be caused by other constraints (a missing constraint file for instance), or by external issues (a network outage between the server and the agent for instance).
0 means no limit.
- Max duration
This is the maximum allowed running duration of the job or jobset (in minutes). Past this limit, the job or jobset will be failed.
0 means no limit.
- Description
Free text area to provide a comment or description for the job or jobset.
This tab defines the parameters of the command to run on the remote agent. There parameters are only used for jobs. For jobsets they will be used as default parameters for their children.
- Command
Command (with its path) to run on the remote agent. Variables defined in environments can be used ($APPLI_HOME/bin/launch for instance). If this field is empty, no command will be run and the job will be immediately completed.
- Username
Remote user name to use to run the command.
- Standard output file
This is the remote file path which will be used for the output (i.e. stdout) of the command. If the file exists at run time, the command output will be concatenated to the file.
Variables defined in environments can be used.
Empty means no output file.
- Standard error file
This is the remote file path which will be used for the error output (i.e. stderr) of the command. If the file exists at run time, the command error output will be concatenated to the file.
Variables defined in environments can be used.
Empty means no error file.
- Success return code
This is the command return code above which the job is failed. If the command return code is equal or lower than this parameter value, the job is declared successfully completed.
- Arguments
This is the list of parameters to pass to the command. Variables defined in environments can be used.
The buttons bellow the list can be used to create a new parameter, to delete the selected one, or to move the selected parameter up or down.
This tab is used to associate environments with the job. For a jobset, it can be used as a default for its children jobs and jobsets. Environments are groups of variables and must have been defined previously through the Environments window (->)
- Load user environment
When the option is checked, the user environment on the remote host will be loaded before starting the job. For example, on Unix systems, the
.profile,.bashrcor.cshrcfiles will be loaded. You must ensure that no interactive commands are used in those scripts as nobody will be able to enter a reply.- Use the parent jobset environments
If this option is checked, only the parent jobset (and its parents up to the Root jobset) environments will be loaded. If not checked you will be able to enter new environments in the list.
- Additional Environments
This list specifies additional environments to load. A special case is when this list is empty. In this case no environments will be loaded even the ones from the parent jobset.
Note however than the associated remote host environments are always loaded (see the section called “Environment tab”).
The button at the bottom of the list can be used to add, remove or move environments in the list. The order of the environments matters as the last value of a variable defined several times will be used.
This tab can be used to define constraint files. You can use this feature to force the job or jobset to wait until a file is present (or missing) on a remote host. For instance, this is a way to start a job as soon as the file to process has been produced. The file to test does not need to be on the same remote host as the job but can be tested on any host that have a Schedwi agent.
The and button are used to add or remove a constraint file. You can change the file name and the remote host directly by clicking on the item in the list.
This tab is used to define the appearance of the job or jobset in the working area. For a jobset, you can also define the icon to use by default for its children jobs. A different icon can be chosen for each status; you can therefore use a color schema to represent the status.
The icons are stored directly in the database.
By using the buttons near each icon, you can load a new icon or save the current one as an image file.
This list presents all the remote Schedwi agents defined in the database. As more than one agent may be defined on a single host but using different TCP ports, the used ports are also listed.
From this window, you can add, edit or delete remote agents.
You can access this window under ->.
- button
Use this button to modify parameters for the selected host.
- button
This button can be used to define a new remote agent.
- button
This button is used to list all the objects associated with the selected remote agent. This is useful as a remote agent cannot be deleted from the list if objects are still associated with it (a job for instance).
- button
Delete the selected remote agent from the list. You cannot remove an agent if some objects are still associated with it. You can use the button to get the list of associated objects.
Refresh the list.
This tab provides the main parameters of a remote agent.
- Host name
Host name or IP address of the remote agent. The provided name must be resolvable through the DNS, NIS or
/etc/hosts.- TCP Port
TCP port to use for the connection with the remote agent. You can use a number or a name in
/etc/services.- Enable SSL
This option enables the use of SSL for the authentication and the communication with the remote agent. However to enable SSL, some further steps are required:
The remote agent must be configured to use SSL (option
SSLEngine=Yin the configuration file of the agent).The SSL remote agent certificate must be uploaded in the database (see the SSL client certificate below).
The Schedwi server certificate must be copied on the remote agent and declared in the configuration file (option
SSLServerCertificateFile).
- SSL client certificate
- button
This button allows the upload of the remote agent SSL certificate in the database. The agent certificate file must be first copied in the local host.
You only need a such certificate if you intend to use SSL for communications with the remote agent.
- button
This button allows you to display the uploaded SSL certificate in the database. The certificate can also be exported as a file on the local file system through this option.
- Description
Free text area to provide a comment or description of the remote agent.
This tab can be used to associate environment variables to a remote agent. Whenever a job is started on the remote agent, the provided environment variables are automatically defined.
You can define here the environment variables required for jobs to run on the
remote agent. For instance, on some Unix systems, some variables must be defined
for commands to be run (LD_LIBRARY_PATH or SHLIB_PATH
for example).
The order of the environment groups defined in this list is important. For
instance, if a variable is defined in two or more different groups, the last one
will overwrite the others. In the same way, if a variable depends of an other
(i.e. FOO=$BAR), it is important that the environment group
which defines the second one is listed first.
- button
Add an environment group to the list.
- button
Remove the selected environment group from the list.
- button
Move up the selected environment group in the list.
- button
Move down the selected environment group in the list.
- button
Move to the top of the list the selected environment group.
- button
Move to the bottom of the list the selected environment group.
Every job and jobset is associated with a calendar. The calendar specifies the days at which the job or jobset must be run.
This window presents the list of all the defined calendars in the left pane. The right pane displays a preview of the selected calendar. You can also choose the year to preview with the and year buttons.
The calendars can be organized in folders. By default, Schedwi is provided with some examples, under the Worldwide and Samples folders. You can directly use them or define you own calendars to suit you needs.
You can access this window under ->.
- button
Use this button to change the parameters of the selected calendar.
- New Calendar or folder
Create a new calendar or a new folder.
- List of jobs using the calendar
This button can be used to get all the jobs and jobsets using the selected calendar or folder. This is useful as a calendar cannot be deleted from the list if a job or a jobset is still associated with it.
- button
Cut the selected calendar or folder. The cut object can then be paste somewhere else by using the button.
- button
Copy the selected calendar or folder to the clipboard. The copied object can then be pasted.
- button
Paste the previously cut or copied object in the currently selected folder (or the folder of the currently selected calendar).
- button
Delete the selected calendar or folder. If a folder is selected, all the calendars and sub-folders in it are also deleted. You cannot delete calendars if they are used by a job or a jobset.
- button
You can use this button to refresh the list.
From this window, you can define you calendar.
- Calendar name
This is the name of the calendar.
- Description
Free text area to provide a comment or description for the calendar.
This is from this tab that the calendar is configured. There are three ways to define a calendar:
In the calendar view, in the lower part of the window, you can directly click on the days, weekdays or months you want to select. This is the easiest way to define a calendar.
In the formula text area, in top left part of the window, you can enter the formula for your calendar. This formula is directly reflected in the calendar view. In case of syntax error, your formula is highlighted in red and you will not be able to save your calendar. This method allows you to use the full power of the calendar engine but requires you to learn the calendar syntax.
You can reuse already defined calendars by copying their formula from the top right part of the window to the Formula text area. This is very useful to combine several calendars into one. For instance, if you want to create a calendar with all the bank holidays for Australia, just select all the required calendars in the top right pane (Boxing Day, Easter, Christmas Day, ...) and click on the Copy button to copy all these formulas in your new calendar.
A calendar formula is a way to define a calendar; it specifies days in a year. The syntax, described here, is powerful but not straightforward. A graphical tool is then provided (->) to help defining simple calendar formulas. This tool comes with predefined calendars (in the Worldwide and Samples folders) that can directly be used by your jobs and jobsets. They are also good examples of formulas.
A formula may contains several lines, each of them defining a set of days. A comment can be
added, on a line by itself, and must start by the # character.
The syntax of each line may take several forms.
This form is described in the following figure and can be used to define a day number in a month.
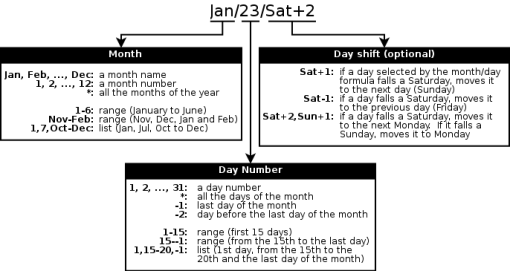
Example 1. Day number calendar formula examples
Mar/14or3/1414th of March.
*/15Every 15th. The
*character, which stands for all the month in this example, can also be used in the day number side of the formula as in the following example.Aug/*Every day in August.
Jan-Jun/23or1-6/23Every 23rd from January to June. The
-character is used to specify a range. It can also be used in the day number side of the formula as in the following example.Dec/15-31Every day between the 15th and the 31st of December (included).
*/-1Last day of every month. A negative day number specifies a day from the end of the month. -1 stands for the last day of the month, -2 for the day before the last day of the month and so on.
Jan,Jun/1,15,-1The 1st, 15th and last day of January and June. The
,character is used to specify a list of months or days.Oct/23/Sat+223rd of October or, if the 23rd is a Saturday, 25th of October. The optional last part (
Sat+2in this example) specifies that if a day falls on a specific week day, it must be moved by the number of specified days.1/1/Sat+2,Sun+11st January or, if it's a week-end (a Saturday or a Sunday), the following Monday.
7/4/Sat-1,Sun+14th of July. If it's a Saturday then the previous Friday or if it's a Sunday then the following Monday.
This form is described in the following schema.
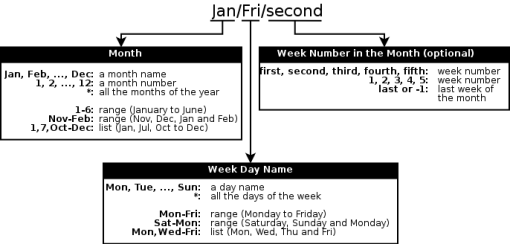
Example 2. Weekday name calendar formula examples
Jan/MonEvery Monday in January.
Nov/Fri-SunAll Fridays, Saturdays and Sundays in November.
May/Mon/firstorMay/Mon/1First Monday of May. The optional last part (
firstor1in this example) specifies the week number in the month.Apr/Fri/LastorApr/Fri/-1Last Friday of April.
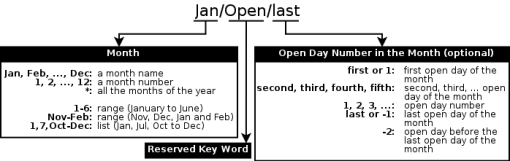
This syntax is described in the following schema and is used to define calendars based on open days.
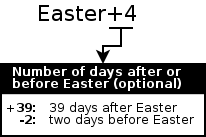
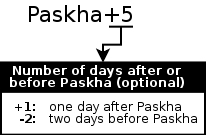
This form is described in the following schema and can be used to define calendars bases on Easter and Paskha (Orthodox Easter).
This list presents the environment groups. Each group contains a list of environment variables. These groups can then be associated with jobs, jobsets, and remote Schedwi agents. From this environments list dialog, you can add, edit or delete environment groups.
You can access this window under ->.
- button
Use this button to modify parameters for the selected environment group.
- button
This button can be used to create a new environment group.
- button
This button is used to list all the objects associated with the selected environment group. This is useful as a group cannot be deleted from the list if objects are still associated with it (a job for instance).
- button
Delete the selected Environment group from the list. You cannot remove a group if some objects are still associated with it. You can use the button to get the list of associated objects.
Refresh the list.
This tab provides the main parameters of an Environment group.
- Environment name
Name of the group.
- Description
Free text area to provide a comment or description for the environment group.
It is in this tab that the environment variables of the group are defined. The order of the variables in the
list is important. For instance, if a variable is defined more than one time, only the last value will be used.
Moreover, if a variable depends of an other one (i.e. FOO=$BAR), the second must be defined first.
From the list, the environment variables can be edited by clicking directly on their name or value. Variable syntax is check and errors are reported in red. Be sure to correct all the errors.
The variable syntax is mainly the same as the Unix shell one. In the value part of each environment variable,
the $ character introduces a parameter expansion as follow:
$parameteror${parameter}The value of
parameteris substituted. The braces are required whenparameteris followed by a character which is not to be interpreted as part of its name.${parameter:-word}If
parameteris unset or null, the expansion ofwordis substituted. Otherwise, the value ofparameteris substituted.${parameter:=word}If
parameteris unset or null, the expansion ofwordis assigned toparameter. The value ofparameteris then substituted.${parameter:?word}If
parameteris unset or null, the expansion ofwordis substituted if not empty. Otherwise the stringparameter null or not setis substituted. This is a different behavior than the Unix shells.${parameter:+word}If
parameteris unset or null, nothing is substituted, otherwise the expansion ofwordis substituted.
This button is used to add a new environment variable. The name and value of the new variable can be edited by directly clicking on the variable.
Delete the selected environment variable.
This button is used to move up the selected environment variable.
This button is used to move down the selected environment variable.
Move the environment variable at the beginning of the list.
Move the environment variable at the end of the list.
This dialog allows you to configure the working area background and size. By default, the parameters are retrieved from the parent jobset, and recursively up to the root jobset. You can however define canvas preferences for a specific jobset by un-checking the Use the parent jobset preferences check box.
You can access this window by right-clicking on the working area background and choosing .
- Use the parent jobset preferences
If you check this box, the parameters used will be the ones from the parent jobset. However, you can un-check it if you want to define the parameters for this jobset. Be aware that the parameters defined at this level will then be the defaults for the sub-jobsets.
This check box is not displayed for the background canvas of the root jobset as it is the top of the jobset hierarchy.
- Background style
- Solid Color
The selected color will be used to fill the whole background.
- Vertical Gradient
The color of the background goes from the first selected color to the second from top to bottom.
- Horizontal Gradient
The color of the background goes from the first selected color to the second from left to right.
- Wallpaper Unscaled
The provided wallpaper image is displayed on the top-left corner of the background. If it does not fill all the background, the first selected color will be used to fill the missing parts.
- Wallpaper Centered
Means that the image will be displayed centered on the working area. If the image is smaller than the working area, the first selected color will be used to fill the missing parts.
- Wallpaper Tiled
Means that the image will be repeated to make a tiled background.
- Wallpaper Scaled
The wallpaper image will be resized to fill as much as possible of the working area. The first selected color will be used to fill the missing parts.
- Wallpaper Stretched
Means that the image will be stretched to fit the entire working area. The image may be distorted when stretched.
- Wallpaper
You can upload an image to be used as the working area wallpaper.
- button
Delete the image. No wallpaper will then be used.
- button
Upload a new image from the local file system.
- button
Export the current wallpaper image to a file on the local file system.
- Canvas size
You can change the working area size through the and buttons. When you reduce the size, jobs and jobsets outside the new boundaries are moved inside the working area.
This window allows you to find a job or jobset. Simply enter the name (or a portion of the name) of the job or jobset you are looking for and click on the button to get a list of matching jobs and jobsets in the Result list area.
From this list, you can directly navigate to the selected item by clicking on the button or by double-clicking on the item.
Upper-case and lower-case are ignored during the search. Main, main and mAin are all the same.
You can access this window under -> or by using the shortcut button in the toolbar.
This window is used to defined default parameters.
You can access this window under ->.
This tab can be used to define the database connection parameters. The first time gschedwi is started, the parameters defined through the Database Assistant are stored here. Alternatively, you can run again the Database Assistant by choosing ->.
- Server Name
Host name or IP address of the MySQL server. The provided name must be resolvable through the DNS, NIS or
/etc/hosts.- Database Name
MySQL database name to use.
- Username
MySQL user name.
- TCP Port Number
Port number of the MySQL database. This port will only be used if the database server is not on same server as gschedwi (i.e. if the server is not localhost). The socket mechanism is used otherwise (see Socket Name below).
- Socket Name
Socket path used to access the MySQL database. This parameter is only used if the database is on the same server as gschedwi.
- button
Revert the database parameters to the previous ones.
- button
Test the parameters by running a database connection test. This test will ask a password for the provided user name.
This tab can be used to customize the grid parameters of the working area. You can choose the style of the lines, their color and the spacing between grid lines.
- Line Style
- Solid
This style shows solid grid lines in the designated color.
- Dashed
This style shows dashed lines in the designated color.
- Intersections (crosshairs)
This style shows a plus-shaped crosshair at each intersection of grid lines.
- Color
Defines the color of the grid.
- Spacing
You can fix cell size of the grid.
This tab can be used to customize the calendar window parameters. You can configure the font used to draw the calendars and the layout to use (first day of week and number of rows).
- Font
You can choose to use the default theme font or a customize one, including its size.
- Layout
- First day of the week
You can define here the name of the first day of the week.
- Number of months by row
This defines the number of months to display on each row. This also imply the number of month by column. For instance, if you choose 4 months by row, there will be 3 months by line.
Firewall systems must be configured to allow the communication between the two applications - gschedwi and gschedwicons - and the MySQL database server. By default, MySQL uses the TCP port 3306.
gschedwi was written by Herve Quatremain
(<rv4m@yahoo.co.uk>). To find more information about
gschedwi, please visit the
Schedwi Web
page.
To report a bug or make a suggestion regarding this application or this manual, follow the directions in this document.
This program is distributed under the terms of the GNU General Public license as published by the Free Software Foundation; either version 2 of the License, or (at your option) any later version. A copy of this license can be found at this link, or in the file COPYING included with the source code of this program.