在這裡使用 GNUstep 的繪圖功能來顯示時間.
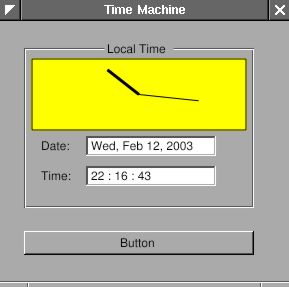
概念上很簡單, 就是在 TimeView 中再加入個自訂元件, ClockView, 即上圖中黃色的時鐘. 當 TimeView 的時間更新時, 也更新 ClockView.
ClockView.h:
#import <AppKit/AppKit.h>
#include <math.h>

@interface ClockView : NSView
{
   NSPoint posHour, posMinute;
}

- (void) setDate: (NSCalendarDate *) aDate;
@end
ClockView.m:
#import "ClockView.h"

@implementation ClockView
- (id) init
{
   self = [super init];
   posHour = NSMakePoint(0,0);
   posMinute = NSMakePoint(0,0);
   return self;
}

- (void) drawRect: (NSRect) frame
{
   NSPoint origin = NSMakePoint(frame.size.width/2, frame.size.height/2);

   NSBezierPath *bp = [NSBezierPath bezierPathWithRect: [self bounds]];
   [[NSColor yellowColor] set];
   [BP fill];

   BP = [NSBezierPath bezierPathWithRect: NSMakeRect(1, 1,
                                                     frame.size.width-2,
                                                     frame.size.height-2)];
   [[NSColor blackColor] set];
   [BP stroke];

   BP = [NSBezierPath bezierPath];
   [BP setLineWidth: 3];
   [BP moveToPoint: origin];
   [BP relativeLineToPoint: posHour];
   [BP stroke];

   [BP setLineWidth: 1];
   [BP moveToPoint: origin];
   [BP relativeLineToPoint: posMinute];
   [BP stroke];
}

- (void) setDate: (NSCalendarDate *) date;
{
   int hour = [date hourOfDay];
   int minute = [date minuteOfHour];
   float hour_x = 40*sin((M_PI*hour/6)+(M_PI*minute/360));
   float hour_y = 40*cos((M_PI*hour/6)+(M_PI*minute/360));
   float minute_x = 60*sin(M_PI*minute/30);
   float minute_y = 60*COs(M_PI*minute/30);

   posHour = NSMakePoint(hour_x, hour_y);
   posMinute = NSMakePoint(minute_x, minute_y);
   [self setNeedsDisplay: YES];
}

@end
ClockView 繼承自 NSView. 最重要的是 -drawRect:. 每次更新視窗時, 就會從 Superview 一路往下呼叫 -drawRect:. 因此所有要更新的部份都在這裡. NSBezierPath 是 GNUstep 中繪圖的元件. 首先先決定路徑, 設定顏色, 最後會是繪圖. 這裡有些相關的文章 (英文) 可以參考: Introduction to Cocoa Graphics, Part I, Part II.
製做好 ClockView 後, 記得在 TimeView 加入 ClockView, 使其成為 TimeView 的 subview. 並在 TimeView 便新時間時呼叫 ClockView 的 -setDate:, 以更新 ClockView 的內容. 在 ClockView 中, [self setNeedsDisplay: YES]; 會通知 GNUstep 要更新 ClockView. 這時 -drawRect: 便會被呼叫. 這些修改很簡單, 可以自行完成.